Monday, May 30, 2011

Cupcake Kit

Hello everyone! Today I want to share with you a fun project I made after seeing it in the inspirational magazine, Simply Handmade.(Above is a photo of what the magazine looks like... you can find them in our stores!)

The project I want to share with you is a Cupcake Kit, which would be a great gift for someone's birthday... or just because.

To start out you want to gather your supplies. You will need paper, adhesive, a 5x5x10 inch box, Shredz, an Epic 6 die cut machine (this machine is included in the Lifestyle Craft Letterpress combo kit), the Scalloped Cupcake Liner cutting die set, a craft knife, a transparency sheet and toothpicks.
First up, you'll want to create a window in the lid of the box. Do do this cut an opening out of the lid of the box with a craft knife and glue a transparency to the inside of the lid.
Next up, create the cupcake liners. This step is so easy! All you need to do is cut down the paper you want the liners to be made out of to 4x12 inches. Then simply run the paper and liner die through the Epic 6 machine. Out will come a cute liner! Simply glue together and repeat!


To top this project off, create decorative toothpicks to stick into the cupcake. To create these simply use the dies and decorative paper to cut out the pieces you'll need.

The great thing about these die cut shapes is they have notches cut in them, so sticking a toothpick in them is so easy!Using adhesive, layer shapes together to create flower toppers.
Next, fill your box with Shredz and the cupcake liners and toppers you just made!

To finish the project, create a tag for the outside of the box. I used a scalloped oval punch with decorate paper and made a title with Tiny Type stickers.
Finally, tie some ribbon around your box and you are done!
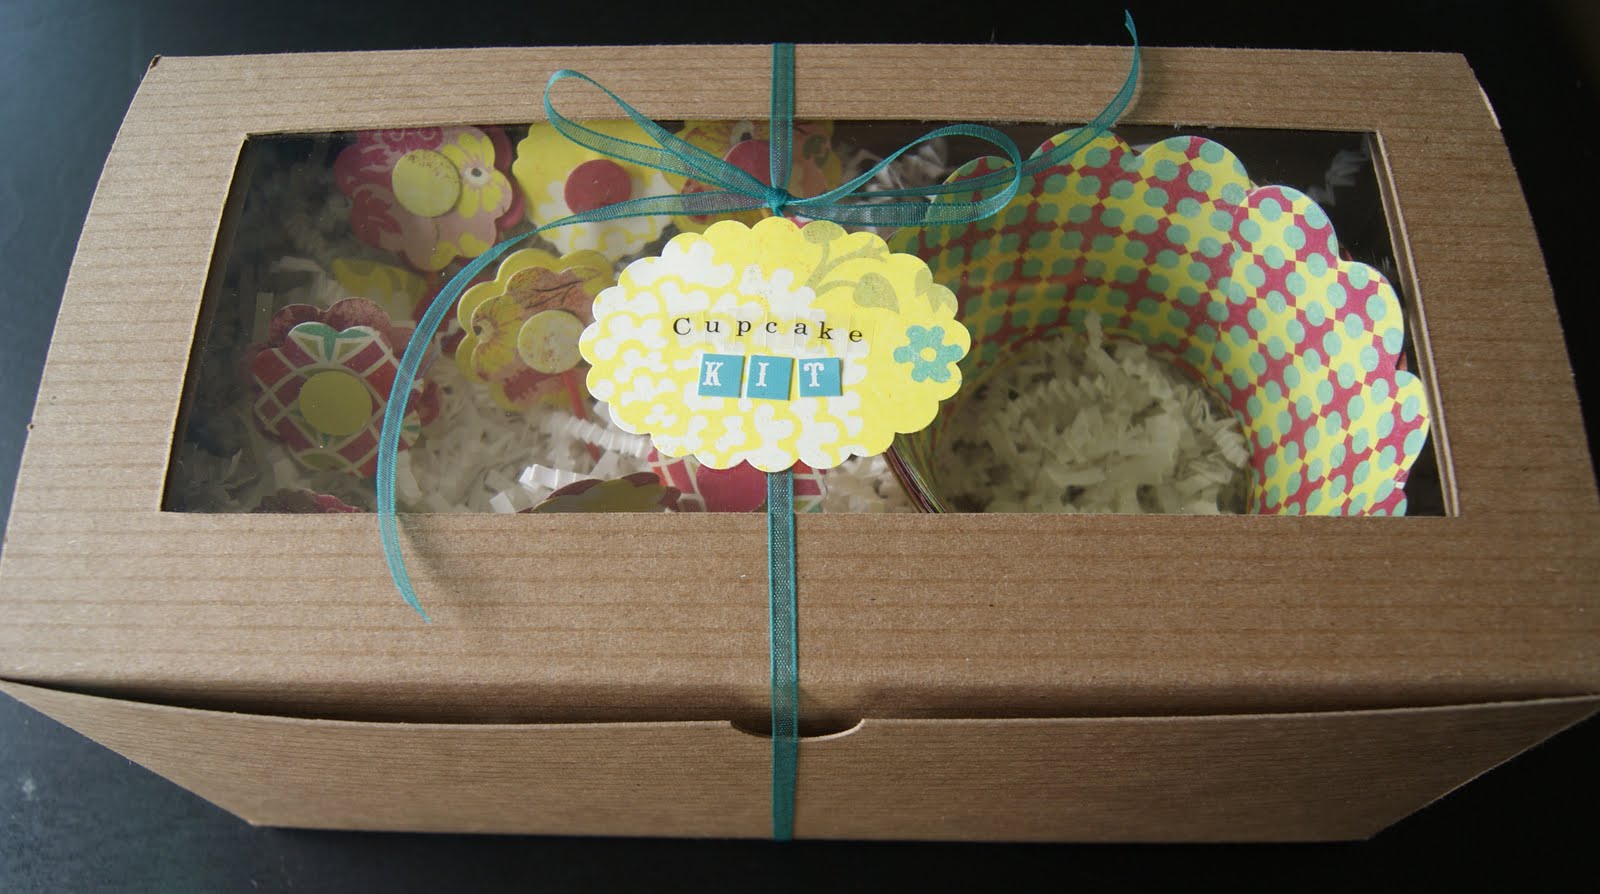
This project can be customized to fit any occasion or theme by selecting paper that coordinates.

Happy Memorial Day!
I hope you all can take a little time today to be creative!
Christina

Friday, May 27, 2011

Liquid Pearls


A little while back we got a fun new product at Paper Zone call Liquid Pearls. Liquid Pearls has been around for a long time, but has recently been reformulated and they have come out with a beautiful batch of great new colors!

Basically, it is a bottle of an opaque gel that dries to a pearly finish. It can be used in many applications, such as pearl accents, flower centers, Christmas ornaments and frosting.

Here at the Tukwila store, we had to open up a bottle the minute we received them from the UPS driver! We started with Flamingo Pink!

There are a few tricks to using liquid pearls to get professional results. First, don't shake the bottle, it will cause air bubbles. I always begin by squeezing a small amount onto a piece of scratch paper before I start so if there is an air bubble I don't blurp (yes, this is a crafting word) onto my project.

Put the tip of the bottle close to your paper and squeeze slowly. This creates a round pearl look. Pull the tip away slowly so you don't get a "point" on your pearl.


If you have a point, pick up your project and flick the underside to flatten out the pointy area. This creates a round top on your pearl.

Liquid Pearls will dry to the touch in about 15 minutes. But I always wait overnight before I put a project in the mail, because the pearl may still be wet on the inside and you can squish them. When totally dry, they are super hard.

We also used liquid pearls for frosting on a cupcake and my favorite, on a donut! On this card, glitter was added to the liquid pearls before it dried.


What creative use do you have for Liquid Pearls? With all the new colors, the possibilities are endless! Whitney - Tukwila PZ

Wednesday, May 25, 2011

Setting the Table


Once your invitations are out and RSVP's start rolling in, it's time to think about your reception and the fun things that go with it like menus, favor boxes and place cards. Today I am going to share with you the place cards I made for my recent wedding.

My first piece of advice for anyone throwing a dinner reception is start with the place card holder. First, it might be difficult to find exactly what you want and second, the shape and size of the card holder will dictate the place card itself. After a lot of searching, I decided on these shell place card holders (above).

And because the slits in the shells were so thin, my original plan of using card stock was dashed. But, no fear, Paper Zone had a text weight (thinner paper) in PZ facets that matched our menus and invitations.

So, to create my place cards I used a few sheets of PZ facets in Belize, some American Crafts ribbon in a chocolate brown, a honeycomb-like stamp, Fresh Ink in Slate and rub on letters from Making Memories.

I started by using the wavy edge blade of my Purple Cow trimmer to cut scalloped edge pieces of paper about 2" by 3". You can use any scalloped edge scissor or trimmer. I just preferred a softer edge than a straight line. This became my base. HINT: if you are doing a destination wedding, cut extras and take them with you. Always be prepared for extra guests or mishaps!

Next, I stamped the top third of the piece of paper with the gray ink. If using a stamp like the design I chose, be careful to line up the pattern.

Next, I used my trusty ATG gun to glue a strip of ribbon along the bottom edge of the stamp.
Cut the edges of the ribbon to match the size of the place card and the shape of the scalloped edge. Use good scissors or the ribbon might fray!

Next, I used these lovely rub on letters from Making Memories to add my guests names. These particular letters are hard to photograph, but in the sun, they were a shimmery silver and looked gorgeous. Another option for adding guest names is to print the names on the paper before cutting it down, or use any other rub on or letter stickers.

Once the names have been added, I made a small bow with the ribbon and glued it on (this time using my 3M glue dots) for an added touch and your done!

Next time I will share with you our menus (that were so easy the groom made them!) and our quick and easy favor boxes.

Thank you for letting me share some of my big day with you!

--Kim

Monday, May 23, 2011

Social Club from Cosmo Cricket!


Happy Monday everyone! I was inspired by this new fabulous line, Social Club. This new line from Cosmo Cricket is inspired by Ol' Blue Eyes himself, Frank Sinatra! Social Club celebrates the appeal of a cool gentleman. With images of martinis, dancing, and fedoras, this line sure has a fun and retro appeal to it! Tomorrow is my birthday and I am going to Vegas to celebrate it, so I decided to use this line to come up with a birthday invitation and matching thank you card.


For this project I used a red card from our new Create-A-Card line from Doodlebug as the base for my invitation. (for more ideas using this card line see Christina's cute blog here
I used 5 out of the 8 12X12 patterned papers, the matching sticker sheet, glossy accents (not pictured), a peacock feather stamp (only $.99!), a couple pieces of solid colored cardstock, and an ATG gun to glue everything together.


I started by cutting 3 strips of paper from my two favorite patterns and a dark brown wood grained cardtock in 3.75", 3.5", and 3" strips. I arranged them in such a way that they gave a staircase look, pictured above.


Then, I peeled off one of the blank tabs from the sticker sheet and stuck it down to the tab on the card and wrote, 'You're Invited'. What I love most about this file folder card, is that when it's placed in the envelope, you can see this little message even before you pull the card out!


After that, I peeled off a border sticker and cut a 4.5" strip and placed it at the bottom of the card to add a little martini olive accent.


Next, using the same dark brown woodgrain cardstock cut a square about 1.75" in size. I peeled off a frame sticker and placed it on the brown square. I then placed this on the right side of my card and used a little bit of foam tape to make it pop out.


Then, I added a little bit of Glossy Accents to the top of a martini sticker to give the impression of liquid. This type of dimensional adhesive is a great way to give any embellishment more personality. Although Diamond Glaze can do the same thing, I prefer to use Glossy Accents because it is a little thicker and tends to stay right where you place it. Also, the fine point tip of the bottle ensures accurate placement.


Once the Glossy Accents is dry (this might take a while) I placed the martini sticker inside the frame. You can also stick it down first and add the Glossy Accents at the end.


Now it is time to do the inside! I cut out one of the blocks with lines so I could write the party information for the inside of the invite. I mounted this on a martini olive pattern paper with about a .25" border.


Then I added the other martini sticker to the inside of the card to add a little more decoration.


Next, I wanted to decorate the envelope so it wasn't so boring. I started by cutting out the word "Celebrate" and glued it to the center of the envelope.


After that, using the letters from the sticker sheet I spelled out "Let Us" and placed it above the "celebrate" image in another staircase pattern.


And....Voila! Your invite and envelope are done! Wasn't that easy?!


Now it's time to make your matching thank you card to give a Thanks! to all those people who came out to celebrate! I started by cutting out another image from the 12X12 pattern paper. I chose to use the image of a man and woman cheers-ing!


I cut out an A-2 card from a green cardstock for the base of the card. Then I cut out a 3.37"X5" sized piece from the same peacock feather design paper I used on the invitation. I placed both this piece and the image onto the card unevenly.


Then I used a blank banner sticker from the sheet, wrote 'Thanks!', and placed it on my card.


Then, using Glossy Accents again, I gave dimension to the champagne glasses on the image.


I like to add a little surprise to the inside of my cards, so I decided to stamp the peacock feather stamps to the inside of the card using a turquoise colored ink.


And.....Voila! Your Thank You card is finished!

I hope you enjoyed these as much as I did making them. I want to thank Whitney, the Manager at our Tukwila store, for giving me the inspiration for the invite. She always has such great ideas!

Happy Crafting everyone!
-Malyse