
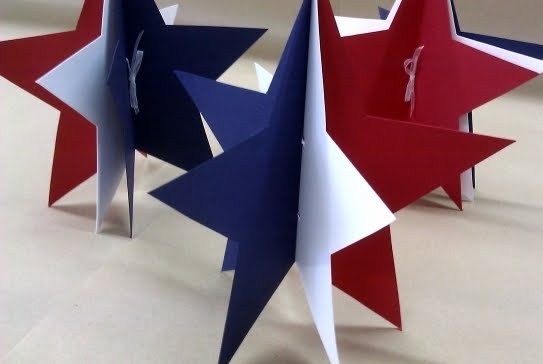
We love parties so much that for the upcoming 4th of July we are providing you with no
 t one, but THREE fun and easy do-it-yourself decorations for your upcoming bbq or patriotic bash. Thank you to Ally in Salem for coming up with these delightful ideas and wonderful blog post!
First the Stars & Strip Windsock:
What you need:
Cardboard tube (I used a cut down empty oatmeal canister)
2 sheets of 8.5 x 11 blue paper (not cardstock)
1 sheet each of 8.5 x 11 white and red paper
4 - 2 inch white stars (or stickers)
6 - 1.5 inch white stars (or stickers)
Glue
Roughly 10" red, white or blue ribbon
Scissors
Hole punch
Red and white crepe paper streamers
Fo r the tube:
Step 1: Cut both blue sheets to 6.5 x 11 (6.5 inches is the height of my tube). Cut the red and white sheets into 2 pieces each measuring 4.25 x 11.
Step 2: Glue the two blue sheets together on the 6.5 inch edge to create one long piece. Glue the red and white pieces the same way.
 Step 3: From the white you will need 2 strips of long paper at 1.5 inches wide and two strips at .5 inch wide. From the red you will need 2 strips of long paper at 1 inch wide. Reserve the remainder of the red paper for later.
Step 4: Glue the 1.5 inch strips to the top and bottom of the blue paper, then the 1 inch pieces, then finally the .5 inch pieces to create the stripes.
Step 5: Liberally glue the back of the sheet and line up carefully on the tube before rolling the tube onto the paper.
 Step 6: Liberally glue the larger stars and space evenly in the blue area, followed by the smaller stars.
To hang it: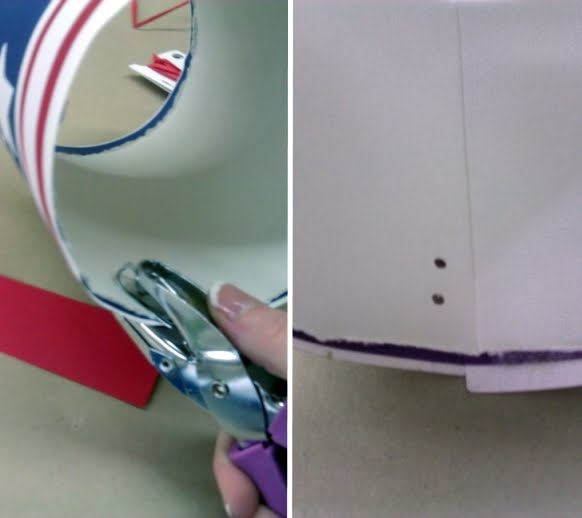
Step 1: Punch holes in the top of the tube on two sides. For strength, punch two holes on each side, one on top of each other (kind of like a "vampire bite").
Step 2:  Pull the ribbon through the top hole from the inside then around the outside and back inside to tie. Tie a strong double knot. Repeat on the other side.

For the streamers:
Step 1: Cut 5 pieces at 18 inches long from both the white and the red.
Step 2: Fold the red in half, lengthwise, then in half again. Repeat for the white. Gently hold the sides and cut down the middle to create narrower strips.
Step 3: Remember that strip of red paper? Here's where you need it! Run a line of glue along the bottom of the strip and attach the streamers,  overlapping a tiny bit.
Step 4: Turn the streamer strip over and run a line of glue down the length. Roll almost into a tube, not pushing hard enough to let the glue secure to the other side. Gently put into the tube, not touching the sides. When the streamer strip is far enough inside that you cannot see the red paper, push down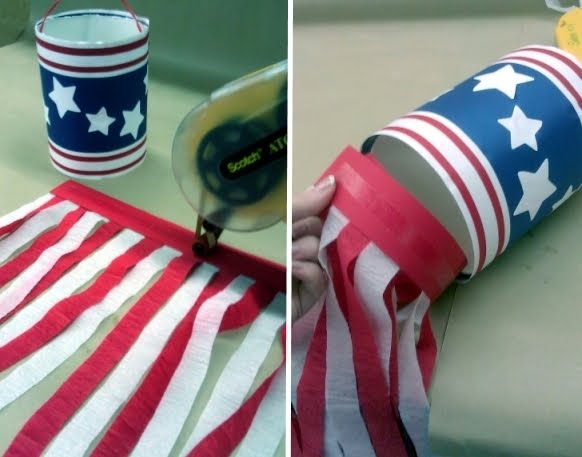 in the middle, then roll the tube while pushing to attach completely. "Fluff" up the streamers and TA DA; a fun and inexpensive way to add a little happy to your Fourth of July!

Now, the 3D Stars: 
What you need:
Heavy cardstocks in red, white and blue (1 sheet each per star)
Scissors
Hole punch (I used the Making Memories Instant Setter)
Ribbon
Pen or pencil
Scoring tool (I used the Scor-It)
No glue needed!
Step 1: Trace stars onto each sheet of paper then cut out.
Step 2: Score down the centers of the red and blue stars.
 Step 3: With all three stars in a stack, punch two holes through them all and lace ribbon through, tying in a bow.
Step 4: Fold the red and blue stars outward to "fluff" the star and VOILA! (See finished product in picture at the top of this blog)
To hang, simply punch a hole through the tops of the stars and run a length of ribbon through to tie around a branch.
And finally, the Star Garland:
What you need:
Sewing machine
White thread
Red, white and blue paper
Step 1: Cut or punch out 12 red 3 inch stars, 12 blue 3 inch stars, and 24 white 2.5 inch stars.
St ep 2: Glue the white stars on top of the blue and red, turning to fill in the spaces.
Step 3: Using the sewing machine on a wide stitch sew down the middle of each star, red then blue, with around a 1 inch or 1.5 inch gap between.
24 stars make a roughly 7 foot garland.
And here is a picture with all of Ally's fun and festive creations!


