Friday, September 30, 2011

GirlFest 2011

Hello PZ Crafters!

I should probably introduce myself (I'm Stephanie) and I am a new blogger for Paper Zone. I began working here in August and have been enjoying every minute of it.

For my first post, I wanted to share my experience at the annual GirlFest event in Seattle. GirlFest is put on by the Girl Scouts of Western Washington and is a great event for girls of all ages to come and have a blast being a girl! At our booth, we did a Make & Take but not just any M&T - fancy, glittery and fun flower pins that were a huge hit!

Check out these creative girls who participated in our GirlsFest M&T...


If you want to make your own flower pin you'll need:


- Pin Backs

- Scrap Paper (different colors)

- Assorted Punches (we used flowers)

- Adhesive or Scrapbooking Adhesive Squares

- Jewel Candy Dots


First:
Cut your adhesive square in half and peel off one side of the square. Then adhere the sticky side on the pin back.

Second: Punch out your paper shapes for your flower pin.


Third: Layer your shapes and glue them together until your design is complete. You can use the adhesive squares or glue. Regular glue works but you will need to be patient and wait for it to completely dry. I suggest a glue stick - it is a good alternative and fast drying. Have fun with layering the shapes - the possibilities are endless!

Fourth: Decorate your flower with jewel candy dots.

Finally:
Peel off the adhesive cover on the opposite side of your square (which should be attached to your pin already) and press your flower creation onto your pin.


Voila! You are finished and have your own flower pin to show off!

Be creative and have fun!

- Stephanie

Monday, September 26, 2011

Folded Leaf Card

In lieu of the brand new origami line we brought into all eight of our stores last week, I wanted to share with you a quick and easy way to make a unique card using paper folding techniques. All you need is paper, a little adhesive, and good paper-folding fingers.

You can use any size rectangle, but I used a 12"X12" piece of thin scrapbook paper and cut it in half to 6"X12". To make the first fold, take the bottom right corner and fold up.

Next, fold the top right corner down.

After that, unfold it. You should see an X shaped crease on the right half of your paper.

Flip the paper over and accordion fold the top right corner down to the center of the X.

Keeping the accordion together, fold the bottom right corner up along the first crease you made.

The leaf should reveal itself as you flatten it out.

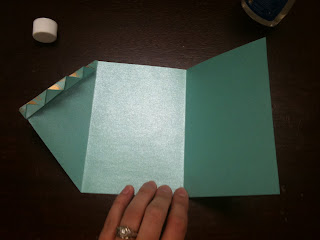
Next, using some double sided adhesive, glue down this flap so the leaf stays in place.

After that, fold the leaf flap down. This will create the top third of your card.

Then fold up the rest of your paper to finish the tri-fold card.

Voila! Your card is done. All you need to do is write your message, put in an envelope, and mail!

You can add variety to your collection of leaf cards by using many different kinds of sizes and patterns. I used the new blue line of 7" Chiyogami to create a tiny card as seen above.

Happy Crafting!
-Malyse

Friday, September 23, 2011

Another Good Bye


One of the things I loved about my job was the creativity and fun that was part of every day at Paper Zone. I'm speaking in past tense because sadly, this will be my last blog post because I have left my job at Paper Zone. I left my job, but not the people.

I will have friends for life from Paper Zone and I will always be PZ's number one fan. I will miss coming up with projects for the blog and sharing with you PZ's amazing products. As a beginner crafter, writing for the blog was a challenge, but it was honestly one of my favorite things to do. So, for my last post I wanted to share with you my personal favorites of the posts I created in a little walk down memory lane.

My first favorite was the 3D Halloween card as shown above. It's that time of year again and I had a lot of fun taking this 3D design that I had used in a previous Christmas card and translating it to Halloween. BTW, I really loved Sandra's pop up Frankenstein too, so check it out if you are looking for some spooky and fun ideas!

Last year we tried something called the 12 days of Christmas and boy that was a lot of work! We really challenged ourselves to come up with a new idea every day and I think we really delivered. My favorite post was the geoball because it was such a challenge to figure out! Once I made the ornament, I was pretty pleased with myself. You will be happy to know that we now sell kits for these in the stores so you don't have to go through all of the measuring that I did to create these.

Also during the 12 days I posted about Christmas Crackers (which I already bought at PZ for this year!!) and ended up with one of my most favorite posts: "Behold the Rat Ring". I loved it because people embraced my weird side and I was able to trick my husband into posing for a photo for it. It was a win win post! :)

In addition to creating projects, I really loved writing about amazing things I saw that made me think of Paper Zone.

Like I still loved the chalk art I saw on my trip to Victoria (which made me think of PZ sidewalk chalk).

And I loved, loved, loved attending CHA and being able to share the amazing things I saw with all of you. The products were great, but the paper dresses and some of the paper art was amazing!!


Lastly, posts that were very dear to my heart were when you let me share details about my wedding. You all are like my family so it was fun to share with you the planning, making the topping on my cake and making place cards for the reception. I'm not exaggerating when I say I was texting the girls back at the office moments before I went down that aisle. You were all there with me in spirit and I could feel the love all the way in Hawaii.

I hope that over the last couple of years of blogging all you readers can feel our love that we put into this blog. I know it will continue to get bigger and better, but will always, always be done out of love: love for Paper Zone, love for crafting and sharing fun project ideas and love for our customer and fellow PZ'ers. It has been an honor to write for you. --Kim

Tuesday, September 6, 2011

New American Crafts Nightfall Collection


Hi Everyone! I am happy to share with you the most
recent offerings from American Crafts, the Nightfall Collection!

I made this card and envelope set and want to show you how easy it was to create.

First I selected the matirials for the card. I chose a few pieces of patterned paper, a Facets card in Terra Cotta and some of the dimensional stickers.


After that I cut down the paper for the background (the blue polka-dot paper) to 4x5.25, rubbed black ink around the edges and mounted it to the a2 Facets card.


Next, I created an embellishment for the card by punched an oval out of the yellow patterned paper and placing one of the dimensional stickers on it.


Then, I cut a strip from another piece of patterned paper to measure 1.5 x 5.25 inches and mounted that to the card before adding the embellishment.


Next, to add a sentiment I stamped "thanks" to a small yellow strip of paper. Then I glued down all the elements to the card.


Then, to spruce up the envelope I wanted to make a liner. This was really easy to do, I just traced the envelope flap onto the paper I wanted to use as the liner. Then cut it out and scored it so that it would fold easier.

Finally I added one of the chalk-board labels to the front of the card to finish it off. These labels are also part of this new collection that just arrived in stores; they are the coolest thing!

Happy (soon to be) Fall!
Christina