Showing posts with label Halloween. Show all posts

Thursday, October 27, 2011

Sparkly Spider Treat Box

Here is a quick and adorable project for those special trick-or-treaters, or perhaps a party favor for your Holidays guests.

First, let’s make sure we have all our supplies:

Trimmer

12x12 Patterned cardstock

Glitter Paper

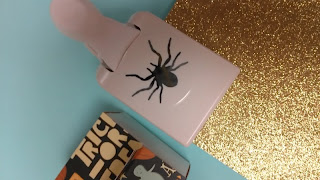
Martha Stewart spider punch

Jute, twine or ribbon

Adhesive/Glue

3x2 box

Next, we are going to take your 12x12 patterned cardstock and cut it to 3”x12” .


You are now going to take that strip and score it at 1”, 2.5”, 4.5”, 7.5”, 9.5” and at 11”.

This will allow it to wrap beautifully around your 3x2 box full of goodies.

Add your favorite adhesive to the 1” end, wrap around your box and adhere.

Now we are going to punch out a couple of spiders, using the Martha Stewart punch.

Take two of these spiders and put them back to back so you can see it nicely from both sides.

Adhere the “bottoms” and back legs together, leaving the head and front legs not adhered. This will allow you to now put the spider over the corner of your box topper.

We are almost done! Wasn’t this easy?!

Now tie some jute, twine or ribbon around the boxes topper.

Add a tag and WALLAH!


You are done!

Leave us a comment and let us know how your project turned out!! We’d love to hear about it!

XO,

Shoreline Paper Zone

Wednesday, October 26, 2011

Happy Halloween!

It's that time of year again for yummy Halloween treats! What better way to give your treats than in festive handmade packaging! This is a simple and easy way to present a gift. For this project you will need the following items:


Tag punch, Happy Halloween stamp, cello treat bags, 1/4" hole punch, black and orange rhinestones, black ribbon, black ink pad, and orange cardstock.


First, start by punching out your tag shape from the orange cardstock. Then, punch a ribbon hole at the top of the tag.


Next, stamp 'Happy Halloween' diagonally on the tag. I also inked around the edges of the tag to give a distressed look.


Now it's time to embellish! Place a few of the orange and black rhinestones in the bottom right corner of your tag in a cluster.


Now, place your treats inside one of your cello bags. I used homemade white chocolate and coconut cookies, but you could use Halloween candy, a candied apple, or anything else festive! Then using the black American Crafts sheer ribbon, tie the tag around the top of your treat bag.


....and voila! Your festive Halloween treat gift is finished!


Happy Halloween and Happy Crafting!


-Malyse

Friday, October 14, 2011

Boo Card


It is almost Halloween. Time for costumes, cider, and candy. All those fun fall things: Pumpkins, apples, and scarecrows. I saw this super cute card and had to make it. This is definitely one of my favorites I have made in a while.

Ingredients for this Card

Black Cardstock - 5.5x4.25
White Cardstock -4.25x11
Cardstock - 8.5x5.5 scored at 4.25 for the card base.
Black Stamp Pad
Deckle scissors
Googlie Eyes
Boo stamp or Alphabet letters Stamp
Paper Trimmer
Adhesives

Step One

Using your deckle scissors, cut the white piece of cardstock across at different angles. Cut another notch out of one of the pieces for the googlie eyes. Using your stamp pad, ink around the edges of the white paper. Don't worry if you get any extra ink on the paper.


Step Two

Layer the inked paper strips on top of the black 5.5x4.25 piece of cardstock. Making sure you leave the notch for the googlie eyes.


Step Three

Using a paper trimmer. Trim the edges so your piece is around 4x5.25.


Step Four

Attach googlie eyes and stamp "Boo" under the eyes. If you don't have a Boo stamp, using alphabet letters would work great.


Step Five

Attach this piece to your base card. I thought it looked best on black. Then you can use a white pen to write your message on the card.


Happy Crafting

Sandra

Friday, September 23, 2011

Another Good Bye


One of the things I loved about my job was the creativity and fun that was part of every day at Paper Zone. I'm speaking in past tense because sadly, this will be my last blog post because I have left my job at Paper Zone. I left my job, but not the people.

I will have friends for life from Paper Zone and I will always be PZ's number one fan. I will miss coming up with projects for the blog and sharing with you PZ's amazing products. As a beginner crafter, writing for the blog was a challenge, but it was honestly one of my favorite things to do. So, for my last post I wanted to share with you my personal favorites of the posts I created in a little walk down memory lane.

My first favorite was the 3D Halloween card as shown above. It's that time of year again and I had a lot of fun taking this 3D design that I had used in a previous Christmas card and translating it to Halloween. BTW, I really loved Sandra's pop up Frankenstein too, so check it out if you are looking for some spooky and fun ideas!

Last year we tried something called the 12 days of Christmas and boy that was a lot of work! We really challenged ourselves to come up with a new idea every day and I think we really delivered. My favorite post was the geoball because it was such a challenge to figure out! Once I made the ornament, I was pretty pleased with myself. You will be happy to know that we now sell kits for these in the stores so you don't have to go through all of the measuring that I did to create these.

Also during the 12 days I posted about Christmas Crackers (which I already bought at PZ for this year!!) and ended up with one of my most favorite posts: "Behold the Rat Ring". I loved it because people embraced my weird side and I was able to trick my husband into posing for a photo for it. It was a win win post! :)

In addition to creating projects, I really loved writing about amazing things I saw that made me think of Paper Zone.

Like I still loved the chalk art I saw on my trip to Victoria (which made me think of PZ sidewalk chalk).

And I loved, loved, loved attending CHA and being able to share the amazing things I saw with all of you. The products were great, but the paper dresses and some of the paper art was amazing!!


Lastly, posts that were very dear to my heart were when you let me share details about my wedding. You all are like my family so it was fun to share with you the planning, making the topping on my cake and making place cards for the reception. I'm not exaggerating when I say I was texting the girls back at the office moments before I went down that aisle. You were all there with me in spirit and I could feel the love all the way in Hawaii.

I hope that over the last couple of years of blogging all you readers can feel our love that we put into this blog. I know it will continue to get bigger and better, but will always, always be done out of love: love for Paper Zone, love for crafting and sharing fun project ideas and love for our customer and fellow PZ'ers. It has been an honor to write for you. --Kim

Friday, October 22, 2010

More Winners!

The winning submissions to the Halloween Crafters Challenge - made by PZ employees are: 1st place goes to Sarah Schilt, Manager at our Tacoma store; 2nd place goes to Helen Hogan-Campbell, Assistant Manager at our Bellingham store. We had so many great entries, please check out our album.

I asked each winner to tell us about their creation. Here is what Sarah said about her unbelievably creative album:
"I am always looking to challenge myself when it comes to being crafty. One of the best ways I have found to do this is to look for random, inexpensive items that can be transformed into something super cute. Recently, Paper Zone started selling plain paper lunch sacks - alone, not that exciting, but when turned into a mini album, simply amazing! (And at only $0.15 a piece, the entire album base cost less than $1.00!) Add some adorable ribbons (at only $0.99 a roll!) and coordinating decorative papers (only $0.89 a piece!) and you have an inexpensive yet priceless mini album that can be given as a gift or used to preserve memories of any kind.

The album I made was inspired by the upcoming Halloween holiday, but just think of all the mini albums you can make: First Day of School, Special Holiday Moments, Friendship Album.the list goes on and on! My next mini album: a collection of my family's favorite recipes to give as Christmas gifts. Think: pull out recipe cards complete with photos of the completed dish, quotes, memories, etc. all compiled into an adorable (and did I mention inexpensive!) gift that will be cherished by many.

The album itself is super easy to make and so much fun!" - Sarah, Paper Goddess

Click here for a list of supplies and step by step instructions for this project.

And here is what Helen said about her spooky little tin:

"I like to alter tins, so thought it might be fun to see what I could create using the challenge products. I used an empty candy tin, measured the top, bottom and around the tin and cut the paper pieces to fit. To get the corners exact I used the Corner Chomper. I could not get the top rim piece straight for the life of me, so finally colored it black with a sharpie. I inked the edges of the paper pieces to "finish" them, and adhered with red line tape. Before I adhered the top I stamped the web and added the skeleton sticker and the button to the web. After attaching the paper pieces inside the tin, I attached Martha's bat punches with glue dots. It was a lot of fun to make, and I've made a few more with candy inside for friends. " - Helen

We hope you were inspired from ALL of the entries. We will be announcing the Holiday Crafters' Challenge on Monday!! --Kim

Wednesday, October 20, 2010

And the Winner Is. . . .

Congratulations to Gillian Moyle Johnston for creating the winning submission for the Halloween Crafters' Challenge!! (PZ employees, we will be announcing an internal winner later this week). Gillian's paper doll stage immediately caught our eye, taking our imagination to a Halloween playland full of charm and whimsy.

I asked Gillian to be a guest blogger and tell us her inspiration behind the project and this is what she had to say:

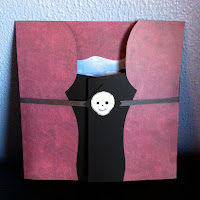
"My inspiration for this project came when I was at Paper Zone to pick out the items I would use in my project and saw the paper doll kit in the Halloween section. I was immediately drawn to it and knew that I had to incorporate them. I thought about how much fun I use to have with my sisters and friends when I was little and how a play stage would be perfect for these charming paper dolls. In designing the stage set for a Halloween theme, I chose a haunted house on a hill (made out of cardstock from an online clip art image embellished with orange and black glitter), the bat flying in the sky, and a tree (drawn and cut out of cardstock, embellished with some stamp pad ink). I imagined a couple of little girls playing with this which is why I wanted the stage to be playful and fun rather than dark and spooky, thus the choice of blue cloud paper for the sky, green cardstock for the grass, and the colorful fall leaves. I thought the star side of the paper was very fitting for a stage floor and the closet door labels. The right side closet I left with just a faux mirror as I thought a little girl would want to be able to have a place for her own creativity to be incorporated, whether that be costumes she creates herself or additional props for play time.

The last element I created was the closure, I thought a simple ribbon with the skull embellishment completed the project nicely and gave a hint of what the theme inside would be. The hardest part was choosing the adhesive for the costumes as I wanted them to stick inside the closet when they were not in use but be able to come off easily during play; I did have to return to Paper Zone and purchase a second paper doll kit as the first attempt to find a good
adhesive did not work as planned; ultimately I used the re-positionable liquid glue for the Slice glass mat. This was so much fun creating, I do sometimes have a hard time deciding what to create, so having the paper, ribbons, and embellishments as a starting point really got this project started. Not to mention having a really good excuse for stopping by the store! Kind Regards, Gillian"

We are thrilled Gillian had the inspiration she did because the end result was a delight! Please check back with us to see the winning submission created by a Paper Zone insider.

--Kim

Sunday, October 17, 2010

Origami Cats

Hi Everyone

Keeping with the spirit of Halloween, I tried my hand at creating two origami cats. The first is simple and the second is intermediate. Of course being who I am, I immediately wanted to jump into the advanced cat, but it was just a bit too frustrating, especially given the fact that I have done very little origami in my life.

I did find it to be a fun project and am looking forward to becoming more proficient and making some great paper art. I have a sneaking suspicion this is just the beginning for me.

Simple Origami Cat
Step 1: Start with a black piece of origami paper or a very thin equivalent.

Step 2: Fold down the top half of the paper and crease.

Step 3: Fold the paper in half once more so it is fourth of the original piece. Re-open the last fold.

Step 4: Using the middle line as a guide, fold over the two opposite corners to create the ears of the cat.

Step 5: Hold down and crease the top triangle to create a flat top of the head.

Step 6: Flip the cat over.

Step 7: Embellish your cat face with eyes, a nose and whiskers. I used googlie eyes, a small piece of pink ribbon for the nose, and thin paper strips for the whiskers.

Intermediate Cat

This cat is more complicated, so I have also included a video showing you how to fold the piece. Since I am new to origami, I am not sure yet of all of the technical folding terms, so this video also helped me out a lot.


Step 1: Start with a square piece of origami paper.

Step 2: Fold the paper in half.
Step 3: Unfold the paper and refold in the other direction.

Step 4: Open up your square and fold in two opposite corners to where they meet at the mid line.
Step 5: Fold over at the mid line
Step 6: Taking one corner, fold over, using both top corner angles as a guide. The top right hand corner should create an angle that is shy of 90 degrees. Line up the right corner with the left corner to create a line running corner to corner. This is important as this fold creates the body of the cat.
Step 7: Fold the bottom half of the body over the corner fold at the fold line. This creates a tail.
Step 8: Unfold to step 5. Holding the tail portion, open up the other fold to look like the following picture.
Step 9: Push down on the side corners to create a face and crease.
Step 10: Using the body as a guide, fold in one of the triangles at the side of the face.
Step 11: Fold the tip of that triangle out to create the ear.
Step 12: Flip the body over to the other side .
Step 13: repeat steps 10 and 11 to create the second ear.

Step 14: Your project should resemble this.

Step 15: Fold down the top point of the head to create a flat top for the head.

Step 16: Crease and tuck in the top fold. It will fit under one of the ears.

Step 17: Flip the cat over and fold the bottom triangle (nose) up.
Step 18: Fold the top of the triangle down to complete the nose.
Step 19: Using the bottom of the cat as a guide, fold the tail in.
Step 20: Unfold this last fold and refold it inside the cat.

Step 21: Take the tip of the tail and fold it back half ways and crease.
Step 22: Now the tail sticks out from the body just a little bit.
Step 23: Decorate the cat face with eyes and whiskers.

If you enjoy these projects, join us at the Paper Zone in Portland, OR for an Origami Class.
The class will be held on October 24th (12pm to 2pm). Ramsay Cowlishaw will be teaching some fun Halloween themed origami projects (pumpkins, bats, and scary masks!)
The class will cost $20, and all materials will be provided.

Happy Crafting, Sandra