Showing posts with label crafters challenge. Show all posts

Wednesday, May 11, 2011

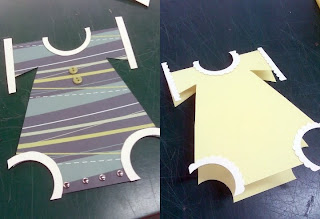
Onesie Invite


We were so inspired by one of the entries to the Oh Baby! Crafters Challenge that we asked Ally, the creator to do a blog post on her entry. So, guest blogging for us today is Ally from our Salem store! You can also find a link to a template Ally created for this adorable invite/announcement by clicking here.

What You'll Need:

Scissors

Scallop scissors

One 8.5 x 11 sheet of cardstock per card

Glue (I used both Liquid Tombo and the ATG gun)

Mini Glue Dots (for 3D embellishments)

1.5 inch circle punch

Step 1:

Fold your 8.5 x 11 in half (hamburger style), then cut in half for two 4.25 x 5.5 cards


Step 2:

Punch the neck hole from the middle of the scored edge on the top of the card, then punch the leg holes from the bottom corners.

Step 3:

Cut a small line about 1.5 inches from the top right edge of the card upwards toward the neck hole, stopping about .5 inch from the neck. Then cut from the edge of the leg hole on that side to the line that you just cut. This will make the sleeves and sides of the onesie. Repeat on the left side.

Step 4:

Using a rubber stamp, you can either emboss (as shown) or stamp the "You're Invited" part on the inside of the card.

Step 5:

For a onesie that is patterned, trace the card onto the back of the patterned piece, cut out, and adhere to the card.

Step 6:

For the edges at the neck, leg, and arm holes, cut out (4) 2.5 x 2.5 inch squares of corresponding paper. On two of them, punch almost an entire circle in the bottom right corner for the leg holes. For one, punch the hole in the very middle of one side for the neck. And for the last, cut two small strips for the arms. Then use either regular or scalloped scissors to cut around the punched/cut edges and adhere to the onesie. Trim edges as needed.

Step 7:

Using the Glue Dots, adhere small bows or buttons to make it even more adorable!

Thank you, Ally, for creating such an adorable project!


Don't forget to join us this Saturday from 11am - 3pm for Paper Zone's Baby Extravaganza!! We will be doing demos on how to create your own baby shower invitations, announcements, party favors and more. I hope to see you there! --Kim

Monday, April 25, 2011

Oh Baby!! Crafters Challenge

Paper Zone is happy to announce our spring Crafters Challenge!! Because there is nothing as new and fresh as a newborn baby, this spring we will be celebrating life's little bundles of joy. We will even be having a special Baby Event in May (stay tuned for more information on that!). So we challenge you to create a "baby" themed project that will inspire us all. It could be a baby shower invitation, a scrapbook page, a baby shower favor, nursery decorations, you decide!

To enter the Crafter's Challenge you must use 3 of the secret ingredients below in your bouncing baby creation. To enter, please email pictures of your project to blog@paperzone.com, or post pictures of your entry on Paper Zone's facebook wall. Entries must be received by Friday May 27th. The winner will be announced May 31st.

The winning submission will receive a $30 Paper Zone gift card!!


The Secret Ingredients are:

  • American Crafts Fabric Paper "Dear Lizzy" line
  • Felt (any color)
  • Basic Grey Buttons (any color)
  • Liquid Pearls (any color)
  • Cosmo Cricket 12 x 12 Upcycle in "re:love"
  • Cosmo Cricket 12 x 12 Upcycle in "re:peat"

Multiple entries are allowed.

Monday, November 1, 2010

Holiday Crafters Challenge

I am excited to announce our next Crafters' Challenge, featuring holiday product available at Paper Zone!! The prize for this challenge will be a $35 gift card at Paper Zone. . .just in time for Christmas!! We received so many great entries for the Halloween challenge, I cannot wait to see what is submitted for Christmas. We have 6 great items for you to choose from to make whatever your heart desires: a card, an ornament, a scrapbook page. . .surprise us! You must feature 1 of the 2 Stardream papers (in either Mars or Emerald) PLUS two of the other Secret Ingredients. The Secret Ingredients for this challenge are:

Stardream Paper in Mars (text or cover)
Stardream Paper in Emerald (text or cover)
Jovial Office Tabs by Basic Grey
Jovial Poinsettia Doilies by Basic Grey
Noel Christmas Collage 12 x 12 paper by Making Memories
Noel Glitter Gem Buckles by Making Memories
If you are up for the challenge (and we know you are!) email a photo of your creation to blog@paperzone.com or post a picture of it on our Facebook wall. All entries must be received by December 10th. Multiple entries are allowed.

So, get those creative juices flowing and wow us! --Kim

Friday, October 22, 2010

More Winners!

The winning submissions to the Halloween Crafters Challenge - made by PZ employees are: 1st place goes to Sarah Schilt, Manager at our Tacoma store; 2nd place goes to Helen Hogan-Campbell, Assistant Manager at our Bellingham store. We had so many great entries, please check out our album.

I asked each winner to tell us about their creation. Here is what Sarah said about her unbelievably creative album:
"I am always looking to challenge myself when it comes to being crafty. One of the best ways I have found to do this is to look for random, inexpensive items that can be transformed into something super cute. Recently, Paper Zone started selling plain paper lunch sacks - alone, not that exciting, but when turned into a mini album, simply amazing! (And at only $0.15 a piece, the entire album base cost less than $1.00!) Add some adorable ribbons (at only $0.99 a roll!) and coordinating decorative papers (only $0.89 a piece!) and you have an inexpensive yet priceless mini album that can be given as a gift or used to preserve memories of any kind.

The album I made was inspired by the upcoming Halloween holiday, but just think of all the mini albums you can make: First Day of School, Special Holiday Moments, Friendship Album.the list goes on and on! My next mini album: a collection of my family's favorite recipes to give as Christmas gifts. Think: pull out recipe cards complete with photos of the completed dish, quotes, memories, etc. all compiled into an adorable (and did I mention inexpensive!) gift that will be cherished by many.

The album itself is super easy to make and so much fun!" - Sarah, Paper Goddess

Click here for a list of supplies and step by step instructions for this project.

And here is what Helen said about her spooky little tin:

"I like to alter tins, so thought it might be fun to see what I could create using the challenge products. I used an empty candy tin, measured the top, bottom and around the tin and cut the paper pieces to fit. To get the corners exact I used the Corner Chomper. I could not get the top rim piece straight for the life of me, so finally colored it black with a sharpie. I inked the edges of the paper pieces to "finish" them, and adhered with red line tape. Before I adhered the top I stamped the web and added the skeleton sticker and the button to the web. After attaching the paper pieces inside the tin, I attached Martha's bat punches with glue dots. It was a lot of fun to make, and I've made a few more with candy inside for friends. " - Helen

We hope you were inspired from ALL of the entries. We will be announcing the Holiday Crafters' Challenge on Monday!! --Kim

Wednesday, October 20, 2010

And the Winner Is. . . .

Congratulations to Gillian Moyle Johnston for creating the winning submission for the Halloween Crafters' Challenge!! (PZ employees, we will be announcing an internal winner later this week). Gillian's paper doll stage immediately caught our eye, taking our imagination to a Halloween playland full of charm and whimsy.

I asked Gillian to be a guest blogger and tell us her inspiration behind the project and this is what she had to say:

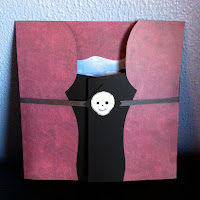
"My inspiration for this project came when I was at Paper Zone to pick out the items I would use in my project and saw the paper doll kit in the Halloween section. I was immediately drawn to it and knew that I had to incorporate them. I thought about how much fun I use to have with my sisters and friends when I was little and how a play stage would be perfect for these charming paper dolls. In designing the stage set for a Halloween theme, I chose a haunted house on a hill (made out of cardstock from an online clip art image embellished with orange and black glitter), the bat flying in the sky, and a tree (drawn and cut out of cardstock, embellished with some stamp pad ink). I imagined a couple of little girls playing with this which is why I wanted the stage to be playful and fun rather than dark and spooky, thus the choice of blue cloud paper for the sky, green cardstock for the grass, and the colorful fall leaves. I thought the star side of the paper was very fitting for a stage floor and the closet door labels. The right side closet I left with just a faux mirror as I thought a little girl would want to be able to have a place for her own creativity to be incorporated, whether that be costumes she creates herself or additional props for play time.

The last element I created was the closure, I thought a simple ribbon with the skull embellishment completed the project nicely and gave a hint of what the theme inside would be. The hardest part was choosing the adhesive for the costumes as I wanted them to stick inside the closet when they were not in use but be able to come off easily during play; I did have to return to Paper Zone and purchase a second paper doll kit as the first attempt to find a good
adhesive did not work as planned; ultimately I used the re-positionable liquid glue for the Slice glass mat. This was so much fun creating, I do sometimes have a hard time deciding what to create, so having the paper, ribbons, and embellishments as a starting point really got this project started. Not to mention having a really good excuse for stopping by the store! Kind Regards, Gillian"

We are thrilled Gillian had the inspiration she did because the end result was a delight! Please check back with us to see the winning submission created by a Paper Zone insider.

--Kim