Showing posts with label baby shower. Show all posts

Wednesday, May 11, 2011

Onesie Invite


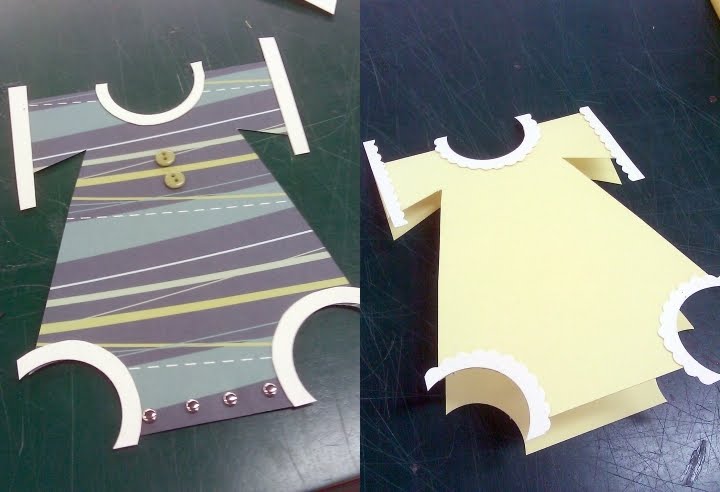
We were so inspired by one of the entries to the Oh Baby! Crafters Challenge that we asked Ally, the creator to do a blog post on her entry. So, guest blogging for us today is Ally from our Salem store! You can also find a link to a template Ally created for this adorable invite/announcement by clicking here.

What You'll Need:

Scissors

Scallop scissors

One 8.5 x 11 sheet of cardstock per card

Glue (I used both Liquid Tombo and the ATG gun)

Mini Glue Dots (for 3D embellishments)

1.5 inch circle punch

Step 1:

Fold your 8.5 x 11 in half (hamburger style), then cut in half for two 4.25 x 5.5 cards


Step 2:

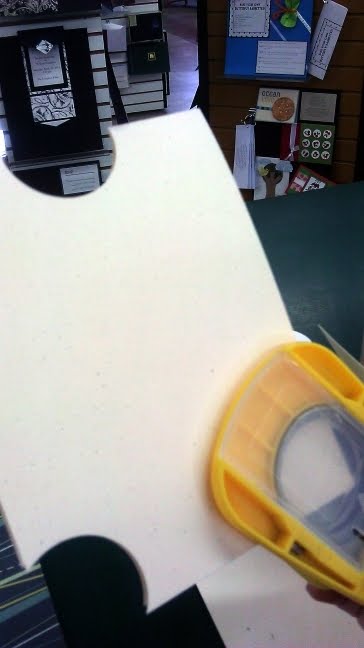
Punch the neck hole from the middle of the scored edge on the top of the card, then punch the leg holes from the bottom corners.
Step 3:

Cut a small line about 1.5 inches from the top right edge of the card upwards toward the neck hole, stopping about .5 inch from the neck. Then cut from the edge of the leg hole on that side to the line that you just cut. This will make the sleeves and sides of the onesie. Repeat on the left side.

Step 4:

Using a rubber stamp, you can either emboss (as shown) or stamp the "You're Invited" part on the inside of the card.

Step 5:

For a onesie that is patterned, trace the card onto the back of the patterned piece, cut out, and adhere to the card.

Step 6:

For the edges at the neck, leg, and arm holes, cut out (4) 2.5 x 2.5 inch squares of corresponding paper. On two of them, punch almost an entire circle in the bottom right corner for the leg holes. For one, punch the hole in the very middle of one side for the neck. And for the last, cut two small strips for the arms. Then use either regular or scalloped scissors to cut around the punched/cut edges and adhere to the onesie. Trim edges as needed.

Step 7:

Using the Glue Dots, adhere small bows or buttons to make it even more adorable!

Thank you, Ally, for creating such an adorable project!


Don't forget to join us this Saturday from 11am - 3pm for Paper Zone's Baby Extravaganza!! We will be doing demos on how to create your own baby shower invitations, announcements, party favors and more. I hope to see you there! --Kim

Monday, April 25, 2011

Oh Baby!! Crafters Challenge

Paper Zone is happy to announce our spring Crafters Challenge!! Because there is nothing as new and fresh as a newborn baby, this spring we will be celebrating life's little bundles of joy. We will even be having a special Baby Event in May (stay tuned for more information on that!). So we challenge you to create a "baby" themed project that will inspire us all. It could be a baby shower invitation, a scrapbook page, a baby shower favor, nursery decorations, you decide!

To enter the Crafter's Challenge you must use 3 of the secret ingredients below in your bouncing baby creation. To enter, please email pictures of your project to blog@paperzone.com, or post pictures of your entry on Paper Zone's facebook wall. Entries must be received by Friday May 27th. The winner will be announced May 31st.

The winning submission will receive a $30 Paper Zone gift card!!


The Secret Ingredients are:

  • American Crafts Fabric Paper "Dear Lizzy" line
  • Felt (any color)
  • Basic Grey Buttons (any color)
  • Liquid Pearls (any color)
  • Cosmo Cricket 12 x 12 Upcycle in "re:love"
  • Cosmo Cricket 12 x 12 Upcycle in "re:peat"

Multiple entries are allowed.

Monday, April 18, 2011

Paper That Grows!


Earth Day is coming up this Friday, so what better time to introduce our new selection of paper from Bloomin! These new papers and mini gift cards can actually be planted and grow into a beautiful array of wildflowers like zinnias, snapdragons and daisies. Do you ever wonder what to do with cards you receive from your friends and family once you've read them and the holiday or special event has passed? I do. I always feel bad throwing them away, mostly because of the sentimental attachment, but also because it just contributes to the ever-growing landfill. With this paper, you can create beautiful cards and once your friends have enjoyed them, they can be planted in a special part of their garden or a pot on a window sill so the memory can last on and on. We are carrying these papers in 8.5x11 sheet packs (either white or assorted colors). The sheets are really versatile. They are sturdy enough to be used for greeting cards or boxes, but the cotton composition still allows it to be easily punched. It also works great in the letterpress machine!
In addition to the sheeets, we also have some mini gift enclosures available in a range of shapes and colors.


Not only are these 2.5" square cards great for a finishing touch on a gift, but the shapes could be used as an embellishment on a more elaborate card or other craft project. There are tons of uses for this paper from Easter greetings to a Mother's Day Card that actually turns into a bouquet!

Seed papers are also great for handmade weddings and baby showers. You can make your own favors like these cute little cards for all of your guests with your special message and planting instructions attached:

Or like thes pillow boxes so you can hide an extra treat inside.


This is such a great way to add a little extra to your celebration and let your guests remember your day for months (maybe years) to come.


Happy Earth Day Everyone!


Amanda

Monday, March 21, 2011

Peter Rabbit Party!


Is there anyone who doesn’t have a fond memory of their mom or dad reading them the Tale of Peter Rabbit just before bedtime? Though it has been over 100 years since this classic children’s book was first published, it continues to be one of our favorites throughout the generations. Now Meri Meri has taken this classic and developed a fantastic new line of party accessories. The Peter Rabbit collection features all of Beatrix Potter’s amazing watercolor illustrations on a fun assortment of different party ware like cups, napkins, and plates.


Best of all there are some great decorative pieces like banners, centerpieces, cupcake wraps, cake stands and more!


It’s everything you need to make a complete Peter Rabbit themed party. Not only is this perfect for a children’s birthday, but would also be great for a baby shower or even Easter Sunday treats!

Happy Spring!

Amanda

Friday, March 18, 2011

Brown Bag It!

Spring is officially only 2 days away and I am so ready for it! I love that the days are getting a little longer and that we have that extra bit of time at the end of the day to go outside and enjoy the sunshine (I know...wishful thinking here in Seattle). I came across this cute idea for a paper bag flower bouquet and thought it was so cute, I had to share it with you!


Spring is the time of Easter brunches, birthday parties and baby showers and this is an adorable way to decorate a table at a party with fresh, bright flowers. It's a table decoration, a place card {write each guest's name on the bag}, and a party favor all in one! All you need is an adhesive, a brown paper lunch bag and some scissors or decorative paper edger.


Step 1: Draw lines on the bag like this:


Step 2: Cut along the lines, using either scissors or decorative paper edgers.

Step 3: Place adhesive on the inside of one of the "handles" and then overlap the two flaps and adhere them together to form the handle.

Step 4: Take a small glass or jar filled with water, place it in the bag and place your flowers inside.

Look at how cute these all look placed on the plates on a table, one for each guest. I just love this idea, it's pretty and elegant, yet super simple and easy. These would also be great for weddings, changing up the flower colors based on your color palette. And, at only $0.15 per bag, it's a really cost-effective decoration!

(photo from marthastewart.com)

Happy {almost} Spring everyone! --LaurenCheck Spelling