Showing posts with label boxes. Show all posts

Thursday, October 27, 2011

Sparkly Spider Treat Box

Here is a quick and adorable project for those special trick-or-treaters, or perhaps a party favor for your Holidays guests.

First, let’s make sure we have all our supplies:

Trimmer

12x12 Patterned cardstock

Glitter Paper

Martha Stewart spider punch

Jute, twine or ribbon

Adhesive/Glue

3x2 box

Next, we are going to take your 12x12 patterned cardstock and cut it to 3”x12” .


You are now going to take that strip and score it at 1”, 2.5”, 4.5”, 7.5”, 9.5” and at 11”.

This will allow it to wrap beautifully around your 3x2 box full of goodies.

Add your favorite adhesive to the 1” end, wrap around your box and adhere.

Now we are going to punch out a couple of spiders, using the Martha Stewart punch.
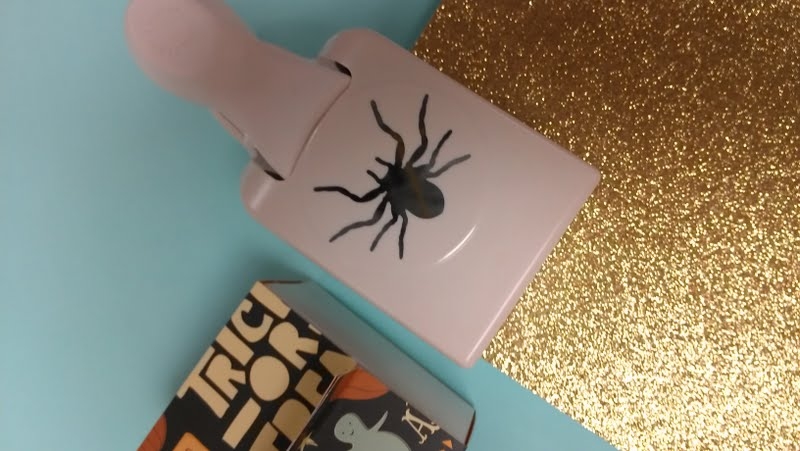
Take two of these spiders and put them back to back so you can see it nicely from both sides.

Adhere the “bottoms” and back legs together, leaving the head and front legs not adhered. This will allow you to now put the spider over the corner of your box topper.

We are almost done! Wasn’t this easy?!

Now tie some jute, twine or ribbon around the boxes topper.

Add a tag and WALLAH!


You are done!

Leave us a comment and let us know how your project turned out!! We’d love to hear about it!

XO,

Shoreline Paper Zone

Friday, June 3, 2011

Candy Box Favors


When I first saw these cute little candy boxes, I just knew I was going to have to make them. I just love little boxes, and what could be better than a little box filled with chocolate!


I have decided to make these little boxes for the office staff at my son's school for an end-of-the-year thank you; but these would make great favors for a wedding, baby shower, birthday, or just as a mean thank you or thinking of you gift.


Ingredients.
1 - 5 1/4 x 3 3/4 piece of cardstock for box
1 - 5 1/8 x 3 1/16 piece of cardstock for the sliding cover
3 - 1 x 3 1/4 strips of paper to cover chocolates
Paper Cutter
Scoring tool
Scissors
Adhesive
3 Hershey Nugget chocolate
Assorted Embellishments


Step One

Score the 5 1/4 x 3 3/4 piece of cardstock at 1/2 inch and at 1 1/8 inch on all 4 sides of the paper.

Step Two


Using your scissors, cut out the 3 squares at each corner on the score lines.


On the 5 1/4 inch sides, cut the score lines at the corners to the 1 1/8 score lines. This will create little flaps.

Hint: Trim the flaps slightly to make putting the box together a little easier.


Step Three

Place adhesive on the inside scored rectangles.


Step Four

Fold the short sides in first, followed by the long sides of the box. The flaps will fit under the long sides. Secure together. Now you have your box.


Step Five

To create the sliding cover, score the 5 1/8 x 3 1/16 piece of cardstock at 11/16, 2 1/4, 2 15/16, and 4 7/16 inch marks.


Step Six

Fold along the scorelines and around the box. Secure the overlapping edge with adhesive.


Using embellishments, decorate the slip cover.

Step Seven

Using the 3 1/4 x 1 inch strips wrap them around the chocolates and secure with adhesive.


Happy Crafting


Sandra

Monday, April 18, 2011

Paper That Grows!


Earth Day is coming up this Friday, so what better time to introduce our new selection of paper from Bloomin! These new papers and mini gift cards can actually be planted and grow into a beautiful array of wildflowers like zinnias, snapdragons and daisies. Do you ever wonder what to do with cards you receive from your friends and family once you've read them and the holiday or special event has passed? I do. I always feel bad throwing them away, mostly because of the sentimental attachment, but also because it just contributes to the ever-growing landfill. With this paper, you can create beautiful cards and once your friends have enjoyed them, they can be planted in a special part of their garden or a pot on a window sill so the memory can last on and on. We are carrying these papers in 8.5x11 sheet packs (either white or assorted colors). The sheets are really versatile. They are sturdy enough to be used for greeting cards or boxes, but the cotton composition still allows it to be easily punched. It also works great in the letterpress machine!
In addition to the sheeets, we also have some mini gift enclosures available in a range of shapes and colors.


Not only are these 2.5" square cards great for a finishing touch on a gift, but the shapes could be used as an embellishment on a more elaborate card or other craft project. There are tons of uses for this paper from Easter greetings to a Mother's Day Card that actually turns into a bouquet!

Seed papers are also great for handmade weddings and baby showers. You can make your own favors like these cute little cards for all of your guests with your special message and planting instructions attached:

Or like thes pillow boxes so you can hide an extra treat inside.


This is such a great way to add a little extra to your celebration and let your guests remember your day for months (maybe years) to come.


Happy Earth Day Everyone!


Amanda

Wednesday, October 27, 2010

Wrap Your Gifts with Origami Boxes


As we approach the gift-giving season, it's always nice to have some new fun ways to wrap up all of those packages. The tower of packages above was created using an age old origami technique and brand new paper from the Making Memories Paper Reverie line. These boxes not only turn out absolutely gorgeous, but they are so simple to do...even for the origami novice. Here are the simple steps you will need to follow:

Step 1: Begin with a square piece of paper. The patterned side (the side you want on the outside of the box) should be facing down as shown.


Fold the paper in half and unfold.


Step 2: Turn the paper 90 degrees and fold in half again and unfold.


Where the folds cross is the center of the paper and will be used as your guide for the steps to follow.

Step 3: Fold each corner in so that it meets the center.


Step 4: Turn your paper 45 degrees. Fold the edge of the paper closest to you up so that it meets the center point of your paper.


Step 5: Turn the paper around and fold the other side to meet the center as well.


Step 6: Unfold the folds you made in steps 4 and 5.


Step 7: Turn the paper 90 degrees repeat steps 4 and 5 but on the sides that have not yet been folded.


Step 8: Unfold the folds you made in Step 7.


You have completed all of the folding that will be required. Now we will put the box together.

Step 9: Unfold the top and bottom corners.


Step 10: While holding up the still-folded sides, pinch in the corners (as shown below where my index fingers are) and bring up the back corner and fold down into the interior of the box.


Repeat on the other side:


You now have the bottom of your box!


To create the box lid, repeat steps 1-3.

In steps 4-7 you will still fold the edges in, but fold them so that they are about 1/8" to 1/4" (depending on the size of paper you start with) shy of the center point as shown below.


Continue with steps 8-10 as shown above and you will have created your box lid. This lid should fit together nicely with the box bottom you have created.


Using a 6"x6" piece of paper, your box will be about this size:


Using a 12"x12" piece of paper, your box will be quite a bit larger, like this:


This simple box is sure to impress anyone on your gift-giving list and there are tons of great papers to choose from, so the options are endless!
I want to send out a special thank you to our teacher, Vicky Mihara Avery from Mountain Valley Paper, who was kind enough to visit this past week and give us a tutorial on this and other great gift wrapping ideas. Thanks Vicky!

Happy Crafting Everyone!

Amanda