Showing posts with label handmade cards. Show all posts

Friday, May 20, 2011

Frame Card


Hi Everyone

May and June for me are definite card making months. There is my father's birthday, husband's birthday, my daughter's birthday, my son's birthday, and Father's day. I had come across this card design in the past, but have never attempted to make it, thinking it would be a good card to make during this time. I decided to make it for my daughter's birthday.


Ingredients for this card:

Scoring tool
4.5 x 9 inch piece of cardstock for the base of the card
4.25x4.25 piece of cardstock in a coordinating color
4.25x4.25 piece of double sided cardstock
Dimensional adhesive
2x2 inch piece of cardstock
Regular adhesive
Assorted stamps and embellishments


Step One

Place your 4.25x4,25 piece of double sided cardstock on your scoring tool diagonally. The points will line up at the 3 inch marks. Score at the 1 inch and 1.5 inch groves. Turn cardstock to score each corner.


Your scored piece of cardstock will look like this


Step Two


Fold the 1.5 inch score lines in and the 1 inch score lines back. Your cardstock now makes a small frame.


Step Three

Score your 4.5x9 piece of cardstock at the 4.5 inches. This is your card base


Round the corners of your 4.24x4.25 piece of cardstock.


Step Four


Stamp a message or embellish the 2x2 piece of cardstock for the center of the frame.


Step Five


Adhere the 2x2 piece of cardstock to the frame with adhesive. Place dimensional adhesives on the inner side of the frame in the .5 inch scored space. Adhere together.


Step Six


Place dimensional adhesives on the center edges of the four sides.
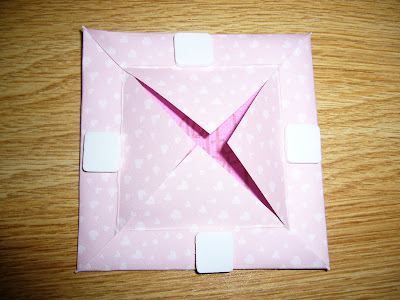


Fold back and adhere. You now have your frame.


Step Seven


Using adhesive, attach the 4.25x4.25 piece of cardstock to the card base.


Using adhesive attach the frame to the front of the card.


Step Eight


Embellish as desired.


Happy Crafting


Sandra

Friday, May 6, 2011

Split Fold Birthday Card


Hi Everyone

This upcoming weekend will be my Dad's 80th birthday party. I wanted to create a special card for him. I decided on a split fold card, and am very happy with the results. I think it turned out masculine and classic. Those were the qualities I was going for. I had never used this fold for a card before, but I can already tell it is going to be one of my favorites.

It is simple to create if you would want to create a card that is similar!

Ingredients for this card
1 piece of 5.5x8.5 neutral cardstock to be used as the base of the card.
2 pieces of 2 1/8x5.5 cardstock. Once piece is your background color while the other piece is a coordinating pattern
1 piece of 2x5.25 cardstock in a coordinating pattern
1 piece of 2x2 carstock in your background color
1 piece of 1.75x1.75 neutral cardstock
Ribbon
Scoring Tool
Adhesive

Assorted Embellishments

***1 piece of 2x.75 cardstock in the background color
***1 piece of 1.75x.5 neutral cardstock
***Small birthday Stamp
***Large Number Stickers
***Large Rhinestone

items marked with *** were the items I used to create this as a birthday card

Step 1

Score your 8.5 x 5.5 piece of cardstock at the 2 1/8 inch mark and the 4.25 inch mark.


Step 2

Fold the card over like a normal card at the 4.25 inch score line. Fold the card back at the 2 1/8 inch score line. Your card should look like the image to the left.


Step 3

I stamped my birthday message on the 1.75x.5 piece of neutral cardstock. Then using adhesive centered it on the 2x.75 piece of background cardstock.


Step 4

Adhere the ribbon to the 2x5.25 piece of coordinating cardstock. Adhere this piece to the 2 1/8x 5.5 piece of background cardstock


Step 5

Adhere the numbers on the 1.75x1.75 piece of neutral cardstock. Adhere this piece to the 2x2 piece of background cardstock.


Step 6

Adhere the layered piece with ribbon on to the right base of the card. Adhere the 2 1/8x 5.5 piece of coordinating cardstock to the folded back piece of your card.


Step 7

Adhere the square number piece to the folded back piece of the card. Adhere the small layered greeting on the top right of the ribbon and embellish with a rhinestone.


Happy Crafting

Sandra

Monday, April 18, 2011

Paper That Grows!


Earth Day is coming up this Friday, so what better time to introduce our new selection of paper from Bloomin! These new papers and mini gift cards can actually be planted and grow into a beautiful array of wildflowers like zinnias, snapdragons and daisies. Do you ever wonder what to do with cards you receive from your friends and family once you've read them and the holiday or special event has passed? I do. I always feel bad throwing them away, mostly because of the sentimental attachment, but also because it just contributes to the ever-growing landfill. With this paper, you can create beautiful cards and once your friends have enjoyed them, they can be planted in a special part of their garden or a pot on a window sill so the memory can last on and on. We are carrying these papers in 8.5x11 sheet packs (either white or assorted colors). The sheets are really versatile. They are sturdy enough to be used for greeting cards or boxes, but the cotton composition still allows it to be easily punched. It also works great in the letterpress machine!
In addition to the sheeets, we also have some mini gift enclosures available in a range of shapes and colors.


Not only are these 2.5" square cards great for a finishing touch on a gift, but the shapes could be used as an embellishment on a more elaborate card or other craft project. There are tons of uses for this paper from Easter greetings to a Mother's Day Card that actually turns into a bouquet!

Seed papers are also great for handmade weddings and baby showers. You can make your own favors like these cute little cards for all of your guests with your special message and planting instructions attached:

Or like thes pillow boxes so you can hide an extra treat inside.


This is such a great way to add a little extra to your celebration and let your guests remember your day for months (maybe years) to come.


Happy Earth Day Everyone!


Amanda

Wednesday, January 26, 2011

Ribbon, Ribbon and More Ribbon!


I'm so excited about the new American Crafts ribbon assortment that has just arrived in our Seattle and Shoreline stores! With over 400 different styles to choose from, it's like being in a candy store. There is a perfect ribbon for any project from wedding invitations to scrapbook pages to cards-even clothing embellishments. A full range of colors are offered in the simple grosgrains, satins and sheers:


Plus there are some great embellished ribbons like these scalloped velvets and gathered satins:


I find this rose ribbon particularly intriguing. It's great for adding texture to cards and scrapbook pages.

Right now this is only in our Seattle and Shoreline stores, but we hope to get it into all of the other stores soon if we have a good response.

Let us know what you think!

Amanda

Monday, December 6, 2010

Layered Glitter Christmas Tree Card

Hi Everyone

This is the time of year is when time seems to be the one thing we definitely need more of. I seem to start out creating a Holiday card that I always think will take just a little less time than it actually does. After making a dozen or so, I turn my attention to making a card that is a little less complicated and simpler to make. That is exactly the case with this Layered Glitter Card.

I used a glue pad to stamp an identical image on top of my inked image and sprinkled glitter over the image. The result is a simple but elegant card.


To create this card, I used the following materials:

Tsukineko - Glue Pad
Colorbox Chalk - Warm Green
12x12 Jovial, Blizzard - Basic Grey cut to 4x5.25
Cardstock - Construction - Cement Green cut to 8.5x5.5 and 3x4
Stamp - Christmas Tree - Memory Box
Glitter - Stampendous, Crystal Snow
Paper Cutter
Scoring Tool
Adhesive
Step 1
Stamp your image on the smaller piece of cardstock. Let dry
Step 2
Using the glue pad, stamp an identical image on stop of the ink image. The second stamp doesn't need to line up exactly.
Step 3
Sprinkle glitter over the glue image and shake of excess glitter.
Step 4
Score the 8.5x5.5 piece of cardstock down the center to create an A2 size card.
Step 5
Attach with adhesive the small piece of cardstock to the 4x5.25 piece. Attach this piece to the scored A2 card.
As quick as that, you are finished with this card.
Happy Crafting
Sandra