Showing posts with label christmas decorations. Show all posts

Thursday, December 15, 2011

Day 15: Winter Berry Lantern


TO CREATE YOULL NEED:

- 3 pack of Paper lanterns

- 5 sheets Text weight Curious Metallics – Jupiter

- 2.5” Uchida Circle Paper Punch

- Hot Glue Gun

1. Punch about 40 circles.

2. Expand your lantern and begin gluing one side of the cut outs around the bottom opening (make sure the side of the circle your gluing is towards the topside creating a hanging effect). Once completed there should be a single row all the way around the bottom opening of the lantern.

3. Move to the next row; glue the row of circles about a third of the way over the previous row, still creating the ‘hanging effect’. Repeat until you reach the top of the lantern. You are finished!

Have fun!

- Seattle Paper Zone

Tuesday, December 13, 2011

Day 13: Holiday Party Picks


Materials you'll need:
- Dress Template
- Cardstock/Assorted Papers
- Ruler
- Colored pens
- Scissors
- Adhesive or Paper Tape
- Dowel or plastic pick


Optional Materials:
- Shimmer Spray
- Flocking


Step 1:
Start with your template. Cut out some red cardstock in the shape of your template. I've used a lovely astro bright but there are also some great options from American Crafts.


Step 2:
Once you have the shape. Use a straight edge to create the black belt at the waist.


Step 3:
Then use a white pen (I've gone with the Uniball gel pen but there are, again, lots of options) to create the white edging on the dress.
For fun I added white flocking to the dress.


Step 4:
The final touch on the dress detailing is a gold buckle (again with a Uniball gel pen).

Step 5:
The next step is adding the pick. Use shimmer spritz to color a trimmed down dowel/pick. I have tried to hold the dowel in between two of the dress forms but it never really looked right to me so I use a little bit of Hambly paper tape to hold the dowel in place.


Enjoy!
~Bellingham

Monday, December 12, 2011

Day 12: Paper Lanterns


Materials you'll need:

8x8 sheet of cardstock
1x8 strip of cardstock
double sided tape
scissors
pencil
ruler
rhinestones
children

These lanterns have been a popular craft for a long time with children and I was reintroduced to them when I read a great book called Christmas Crafting with Kids (available at the Paper Zone). So I gathered up some supplies, my beautiful niece Dyanna, and my wonderful nephew Cody to make some!

Step 1:
Cut from any cardstock that you want one 8x8 inch square (for the base) and a 1x8 inch strip (for the handle). Set the strip off to the side.


Step 2:
Fold the square in half.


Step 3:
Using a ruler, mark every one inch on the folded edge that you just made. Draw lines going straight up from where you marked to roughly 1 1/2 inches from the top.


Step 4:
Cut the lines, being sure not to cut all the way through to the top.


Step 5:
Using double sided tape, glue one of the newly formed slats on top of another, turning it into a tube.


Step 6:
Gently push on the top of the tube to push out the slats. This was Cody's favorite part as they are quite springy!


Step 7:
Tape the handle inside the top of the tube.


Step 8:
Decorate using a strip of rhinestones (or you can use something like ribbon, sequins, etc.)


These easy, kid-friendly decorations are beautiful and versatile. Try hanging them as a garland, put a tall hurricane vase with a candle inside, or they can just stand alone as is!


Have lots of fun with this craft and have a wonderful holiday season!

- Ally and the Salem Paper Zone family

Sunday, December 11, 2011

Day 11: Holiday Magnets


This is a simple and fun way to use your left over holiday brads. Simply cut of the shank of the brad, glue to your magnet and you are done!

Happy Crafting!
- Beaverton Paper Zone

Saturday, December 10, 2011

Day 10: A Scalloped Christmas Tree


We saw this cute die-cut tree on the Life Style Crafts blog and couldn't resist making it here for our store. Our letterpress combo kit has become something like a store mascot here in Bellingham, we use it for everything and love any excuse to play with it. So with that in mind here's how we make the tree:


Step 1:
Stand facing the combo kit. You will want to gather up the Life Style Crafts nesting scalloped dies, your die cutting machine (we of course used the combo kit but you can use your cuddle bug or manual cutting machine of choice), a dowel, ink for edging and coloring your dowel, white craft glue (we used tacky glue but Elmers works just as well), a small cardboard square which will be your base, a 6x6 paper pad of your choice (we used Basic Gray's Nordic Holiday), a small amount of gold foil paper and a star shaped punch.


Step 2:
You will want to place your cutting die edge side up in the arm and place the paper over it. If you're being really clever about the layout you can fit several dies on one piece of paper.


Step 3:
Cut out 4 of each size of scallop.


Step 4:
Once all of your scallops are cut you may want to edge them with ink. I find that this creates a more finished look.


Step 5:
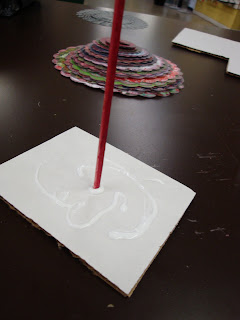
Now place the dowel in your cardboard base and cover the base with glue.


Step 6:
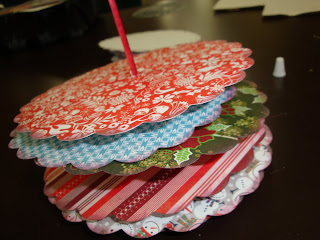
You will want to start putting the cut out scallops on the dowel starting with the largest and working to the smallest. I pre-punched a hole with an awl to make this step easier. I also found that putting the smallest dab of glue on the pre-punched hole before placing the scallop on the dowel kept the pieces spaced out nicely once they were on the dowel. The spacing of the pieces on the dowel is a matter of personal choice. I like them spaced out and kind of askew. Kelly prefers them one-on-top of the other and totally in line. I suppose it's all a matter of how you want your tree to look in the end.


Step 7:
Once all of the scalloped pieces are on the dowel you will want to top your tree. We used a foil star but you could use any fun shape or charm.

Enjoy!
~Bellingham

Friday, December 9, 2011

Day 9: Paper Heart Ornaments


Materials:
- Assorted 12x12 Paper
- Paper Trimmer or Scissors
- Ruler
- Brad, eyelet or staples
- Fishing line or ribbon


Step 1:

You will want to select 3-4 double sided papers. For this post I used some of our lovely 12x12 Christmas papers.


Step 2:
Cut these into 1" wide strips. You will need:
- (2) 7" long
- (3) 6" long
- (2) 5" long


Step 3:
One of the 6 inch strips will be the center of your heart ornament. Starting about 2.5" from the bottom of your center piece you will want to place the top edges of the 5" long strips. They will go face down onto the center piece. One strip will go on each side. You can affix them there with a brad, eyelet or staple (I used brads). About a half inch above that you will do the same thing with the 6" long strips and another half inch above that you will affix the 7" strips.


Step 4:
Now you have a sort of inverted tree of paper strips and you will start to pull the top ends of your 5", 6", and 7" strips to the base of your center strip. Using one brad, eyelet, or staple hold them all in place there. This forms a natural heart shape and creates a darn cute ornament for a modern tree.


Happy crafting
~Allie from Bellingham

Wednesday, December 7, 2011

Day 7: Origami Star Ornament


Materials:

- (5) 4” Squares of Origami or Double-sided Scrapbook paper

- (2) 2 1/8” Squares for Covers

- (1) 18” Length of Thin Ribbon

- Double Stick Tape


  1. Fold 4” square horizontally & vertically.
  1. Fold diagonally twice.
  1. Open up the square & you will have two diagonally folds, one vertical & one horizontal fold.
  1. Fold into a triangle.
  1. Fold the outer ends of the triangle inside towards the center. You will end up with a square.
  1. Using double stick tape, attach the five squares. Keep each end free.
  1. Fold the ribbon in half. Place double stick tape on each diagonal. Keep the looped end of the ribbon on the closed part of the square & the open length on the open end of the ornament.
Have fun!

- Tukwila Paper Zone

Monday, December 5, 2011

Day 5: Paper Straw Wreath


This project was featured on the cover of "Women's Day" magazine. I was so excited when I saw this project... It looks great as a holiday piece or just some decoration for a bare wall.


Materials:

- Pencil
- 6" Flat Floral Ring
- (1) Box of 144 ct. Paper Straws
- Scissors
- Ruler
- Ribbon or Wire

Optional:
- Paper or Spray Paint

Step 1:

This step could be optional. Trace and cut out a copy of the floral ring from a sheet of paper. Adhere the paper copy to the ring. (Tip: You could also spray paint the ring whatever color you want.) I actually did not do this step on the featured sample and you could not see the ring behind all the straws.

Step 2:

Separate, measure and trim down the straws:
- (49) 6 1/2 inch straws
- (49) 5 1/2 inch straws
- (25) 3 7/8 inch straws (This size would be cutting the straws in half. You will get 50 total pieces for your project.)

Step 3:

Apply a dime sized drop of glue to the end of a 6 1/2 inch straw and adhere it to the ring. Make sure the straw is flush to end inner edge of the ring - continue until the entire ring is evenly covered with the 6 1/2 inch straws.

Step 4:

Repeat step 3 using the 5 1/2 inch straws. You will layer these in the crevices of the 6 1/2 inch straws already glued to the ring.

Step 5:

Repeat Step 3/4 using the 3 7/8 inch straws. You will layer these in the crevices of the 5 1/2 inch straws already glued to the ring.

Step 6:
Glue a piece of ribbon or wire on the back and hang!


Voila you are done! This is a fun idea and gives a bright pop of color to your walls. You can add a bow on the front or other holiday embellishments to spruce it up. I plan on using it just as holiday wall art through the season - then moving it to my blue and red kitchen as a fun piece to hang as decoration! You could also change it up and spray paint then entire piece with a solid silver or chrome finish spray paint for a clean and modern piece of wall art. You could also make a few experimenting with sizes/colors and you will have an entire wall of fun retro sunbursts.

Happy crafting!

- Stephanie