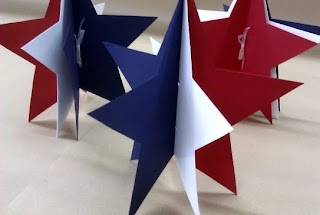
Friday, July 1, 2011

Have a festive 4th!


We love parties so much that for the upcoming 4th of July we are providing you with not one, but THREE fun and easy do-it-yourself decorations for your upcoming bbq or patriotic bash. Thank you to Ally in Salem for coming up with these delightful ideas and wonderful blog post!

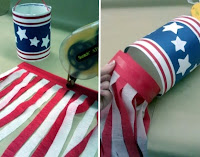
First the Stars & Strip Windsock:

What you need:

Cardboard tube (I used a cut down empty oatmeal canister)

2 sheets of 8.5 x 11 blue paper (not cardstock)

1 sheet each of 8.5 x 11 white and red paper

4 - 2 inch white stars (or stickers)

6 - 1.5 inch white stars (or stickers)

Glue

Roughly 10" red, white or blue ribbon

Scissors

Hole punch

Red and white crepe paper streamers


For the tube:

Step 1: Cut both blue sheets to 6.5 x 11 (6.5 inches is the height of my tube). Cut the red and white sheets into 2 pieces each measuring 4.25 x 11.

Step 2: Glue the two blue sheets together on the 6.5 inch edge to create one long piece. Glue the red and white pieces the same way.

Step 3: From the white you will need 2 strips of long paper at 1.5 inches wide and two strips at .5 inch wide. From the red you will need 2 strips of long paper at 1 inch wide. Reserve the remainder of the red paper for later.

Step 4: Glue the 1.5 inch strips to the top and bottom of the blue paper, then the 1 inch pieces, then finally the .5 inch pieces to create the stripes.

Step 5: Liberally glue the back of the sheet and line up carefully on the tube before rolling the tube onto the paper.

Step 6: Liberally glue the larger stars and space evenly in the blue area, followed by the smaller stars.


To hang it:

Step 1: Punch holes in the top of the tube on two sides. For strength, punch two holes on each side, one on top of each other (kind of like a "vampire bite").

Step 2: Pull the ribbon through the top hole from the inside then around the outside and back inside to tie. Tie a strong double knot. Repeat on the other side.


For the streamers:

Step 1: Cut 5 pieces at 18 inches long from both the white and the red.

Step 2: Fold the red in half, lengthwise, then in half again. Repeat for the white. Gently hold the sides and cut down the middle to create narrower strips.

Step 3: Remember that strip of red paper? Here's where you need it! Run a line of glue along the bottom of the strip and attach the streamers, overlapping a tiny bit.

Step 4: Turn the streamer strip over and run a line of glue down the length. Roll almost into a tube, not pushing hard enough to let the glue secure to the other side. Gently put into the tube, not touching the sides. When the streamer strip is far enough inside that you cannot see the red paper, push down in the middle, then roll the tube while pushing to attach completely. "Fluff" up the streamers and TA DA; a fun and inexpensive way to add a little happy to your Fourth of July!


Now, the 3D Stars:

What you need:

Star template (click here)

Heavy cardstocks in red, white and blue (1 sheet each per star)

Scissors

Hole punch (I used the Making Memories Instant Setter)

Ribbon

Pen or pencil

Scoring tool (I used the Scor-It)

No glue needed!

Step 1: Trace stars onto each sheet of paper then cut out.

Step 2: Score down the centers of the red and blue stars.
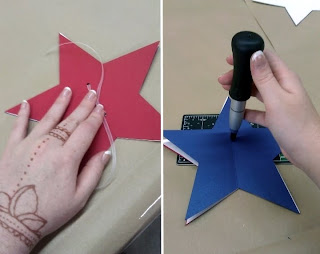
Step 3: With all three stars in a stack, punch two holes through them all and lace ribbon through, tying in a bow.

Step 4: Fold the red and blue stars outward to "fluff" the star and VOILA! (See finished product in picture at the top of this blog)

To hang, simply punch a hole through the tops of the stars and run a length of ribbon through to tie around a branch.


And finally, the Star Garland:

What you need:

Sewing machine

White thread

Red, white and blue paper

Step 1: Cut or punch out 12 red 3 inch stars, 12 blue 3 inch stars, and 24 white 2.5 inch stars.


Step 2: Glue the white stars on top of the blue and red, turning to fill in the spaces.

Step 3: Using the sewing machine on a wide stitch sew down the middle of each star, red then blue, with around a 1 inch or 1.5 inch gap between.

24 stars make a roughly 7 foot garland.

And here is a picture with all of Ally's fun and festive creations!


Wednesday, June 29, 2011

4th July Bag


Happy 4th of July…almost. The 4th of July is definitely my favorite holiday of the year. It has been since I was a kid. The only expectation for the day is to have fun: BBQ, friends, family, and some fireworks if you are lucky.

This cute little pocket bag is perfect to hold poppers or crackers to give to the kids at your 4th of July gathering. It would also be great to hold a host of other treats.


Ingredients for this bag:

1 blue 12x12 for the bag
Red cardstock for stripes
White cardstock for stars
Adhesive
Scoring tool
Paper cutter

Directions:

1. Make 3 scores on a 12x12 at 6.5 inches, 6 inches, and then 5.5 inches.


2. Rotate the paper by a 90 degrees, and make 2 scores at 8.5 inches and 4 inches.

3. Crease both of these later scores and apply adhesive to the reverse side along one outside edge. Fold over and seal.
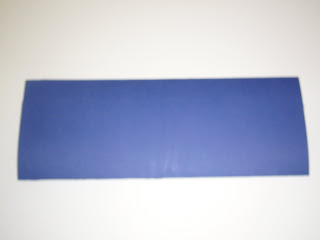


4. Fold the piece in half along the middle score with the sealed side facing out.

Now fold at the two remaining score lines in the opposite direction.

Put a small amount of adhesive in the middle of the inside short edge and adhere both edges together. You should now have your bag.


5. Punch two small holes on each side of the top of the bag.

Cut two 6 inch pieces of ribbon. Knot ribbon (I double knotted it to make it more substantial) on one end.


Thread ribbon through each set of holes and knot the opposite end to make the handles.


6. Cut ½ inch strips of red cardstock to use as stripes.

Place them on the bag and trim.

Adhere with adhesive.


7. Punch out stars from white cardstock

Adhere the stars to the bag.


Fill your bags with goodies!

Happy Crafting and Happy 4th of July

Sandra

Tuesday, June 28, 2011

Candy Bar Party Favor

Usually, when I think of a candy bar I imagine your typical Hershey bar or something along those lines. This weekend I had the opportunity to go to a wedding where they put a creative twist on the "candy bar" by having and actual bar full of candy. Each of us found our specific take out box that indicated our table. I happened to be at the Sour Patch Cherries table.


Upon arrival we discovered a huge bowl of Sour Patch Cherries candy at our table free for the taking. Not only was this a fun and different favor, but each table had their own type of candy so we could all wander from table to table and meet other people along the way and collect our goodies - it was a great ice breaker.


Of course there was another table of supplemental candies just to make sure there was something for everyone.


This was such a simple but really creative idea, especially for anyone with a sweet tooth! -Amanda

Friday, June 24, 2011

Ooh-la-la!

Every time we participate in Wedding Shows, people go absolutely nuts over this lingerie shower invitation. So many times, I've seen people walking down the crowded Convention Center aisles and watch their eyes zone in on this invite, and then bee-line it right to our booth. It's funny to watch, but I understand their reaction because it's super cute and a little risque at the same time - a perfectly playful and girly invitation.
And it's great for a bachelorette party or lingerie shower. While it looks like it might be complicated to create, it's actually pretty easy as long as you have our template, one piece of 8.5" x 11" lightly-colored cover weight paper, one black sheet of paper, and some ribbon and rhinestones for embellishments.

You will start by printing out the template on a piece of plain scrap paper, you will be cutting this out and tracing it on your nicer cardstock. I'll break the invite down step by step to make it easier for you.

Step 1: After printing the template, cut it out on the dotted lines and then trace it on your lightly colored paper; then cut out that shape that you just traced. This will be the base of your card (the "skin" part).


Step 2:
Now, you want to take your cut out piece and fold that in half, since this part is the base of your card. I used a Scor-It Board to make sure I got a nice clean fold, as shown here:

Step 3: Take your template and now cut along the solid lines, this is going to create the template shapes for the underwear pieces.Next, line up your template on your black paper and trace those pieces.


Step 4
: Cut out the traced out bra and panty piece and adhere the bra to the front of the card like so:


Step 5:
Adhere the panty party to the back of the card and cut out little strips of paper and some ribbon to make the straps of the bra. Adhere the ribbon right on top of the black strip, and then adhere that to the card.


That's all there is to it! Easy, right? And once you have the templates cut out, you can make a bunch of these really quickly since it's just tracing and cutting. The best part of making this card is personalizing it and decorating it. I added some little cute ruffle ribbon to the back of mine to spruce it up.

I also LOVE the idea of blinging up the straps with rhinestones & glitter and switching up the color combos of the paper. Using some patterned paper for the bra and panty part would be super cute with some lacey ribbon. This is the kind of card that will make your phone start ringing with people asking you how you made it and wanting the template. Enjoy, and have fun with this one! --Lauren