Showing posts with label quilling. Show all posts

Monday, April 11, 2011

Happy Anniversary Paper Zone Blog!

A year ago we at Paper Zone decided that we wanted to interact with Paper Zone customers in a fun and creative way. Our goal was not to sell product, but to share ideas and foster inspiration. We had no idea how much fun we would have along the way!

When we started the blog, none of us had ever blogged before, and many of us are novice crafters so we thought "what can we teach anyone?". But when you have a love and enthusiasm for creating, and access to so much great stuff (from PZ of course!), ideas arise, inspiration occurs and I think some really great posts have emerged.

We purposefully sign each post so that you know who the creator is and I am sure that you have a favorite or two in the mix. So, today I am going to introduce you to our blogging team and share with you their favorite post from the 1st year. Going back, you can see, we've come a long way baby!!

Lauren. Lauren is our Marketing Manager and what I love about her posts is that she is great at bringing the unexpected: headbands, canvas gifts, etc. Lauren's posts show the real depth of what Paper Zone product has to offer. When asked which of her posts was her favorite, it was the most popular post OF ALL TIME, the tissue puffballs (aka Martha Stewart puff balls, pom poms). Lauren says she has even used these puff balls for her grandfathers birthday party. We have used them on numerous occasions (like Girlfest! above) and they never get old!

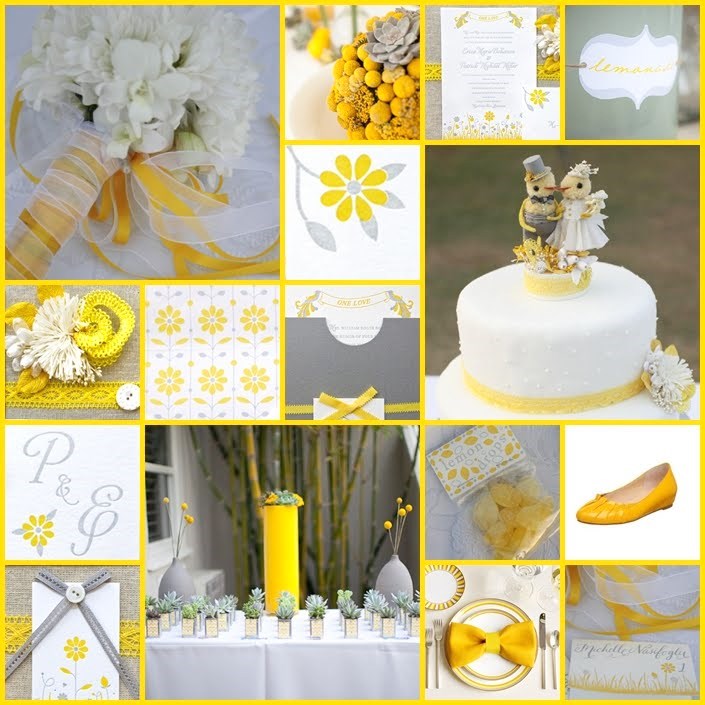
Christina. Christina is the Regional Manager of Paper Zone, overseeing the stores. She is our 'go to' person when it comes to crafting knowledge and she always has super cute ideas (and is the Fimo master). Being the mother of a 1 & 1/2 year old, I do not know how she finds the time to craft, but I am glad she does!! Her favorite post was her yellow and gray post demonstrating how easy it is to make your own wedding invitation. Christina says that she picked this post because it encompasses what she loves about Paper Zone: being able to help people on their most important days (weddings, birthdays, etc.) AND we cannot get enough of the yellow and gray color combo!!

Sandra. Sandra is our Replenishment Buyer, who makes sure all of our stores stay well stocked. She is the cardmaker of the bunch and always comes up with creative elements resulting in more than just a typical card. Her favorite post is the waterfall card. This is one of those creations that I'm thankful for You Tube for, because it was such a neat card to see. Sandra loves this card because it's versatile and the design can be used for any event, not just holidays.

Amanda. Amanda is our Merchandise Manager who is responsible for buying all the great stuff we have in our stores. Amanda's favorite post is also up with our top posts viewed by you: Glubers are Here! Having been with Amanda at CHA when she first saw the glubers, I know why she loves this post. It was like seeing a child's eyes light up on Christmas morning when she made her first rosette and proudly wore it during the show. You can't beat a product that makes crafting easy with results that are pretty darn cool.

Kim (me). I am the General Manager of Paper Zone, overseeing, well, everything and I am the most inexperienced crafter of the bunch. So, if I can make something, you know you can do it too!

I have to say that I really loved the 12 days of Christmas because we were a little nervous about trying to come up with so many ideas and, as usual, we had more than we could post. Plus I was able to trick my husband to pose with the paper hat in the "rat ring" post. Those holiday posts were about real sharing of real traditions and I loved it.

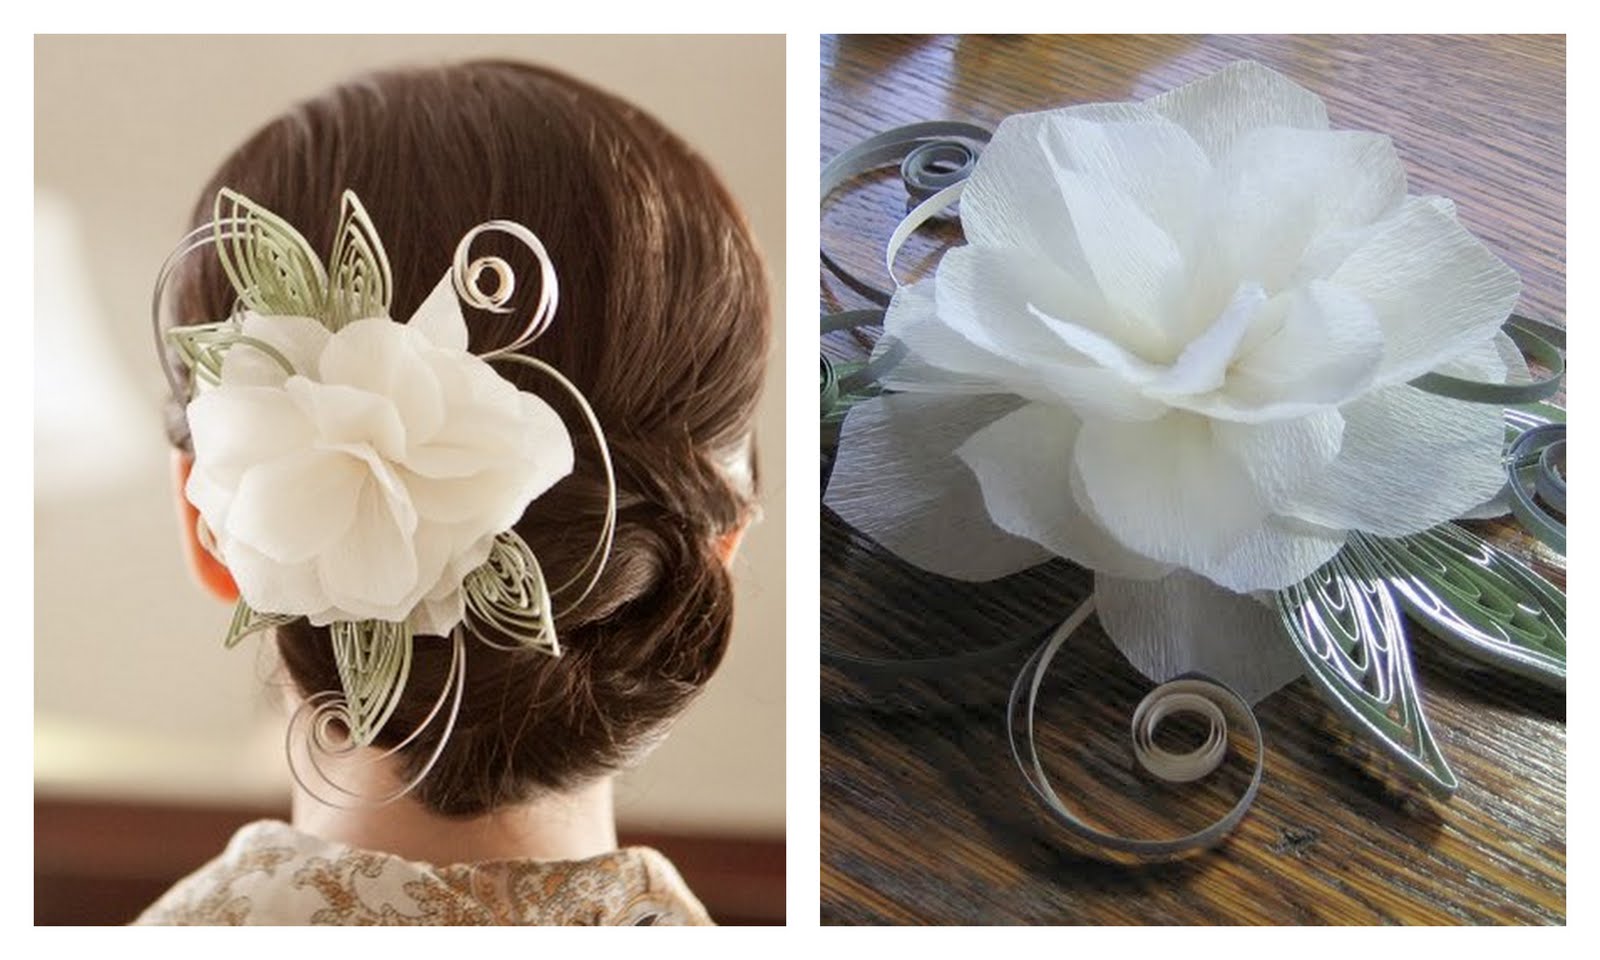
But my favorite post has to be my first attempt at quilling. I was so amazed that I was able to quill a flower and a dragonfly on the very first try I thought I stumbled upon the next great art. . .and I still feel that way!!

During the year we also had some posts by Tiffany, our Assistant Buyer who has since moved on and we will now be hearing from Malyse who brings a great scrapbooking background to the mix. We also have had great contributions from the stores and we hope to have even more in the coming year.

We remain committed to providing at least 3 great posts a week with creative project ideas, interesting techniques, sharing other blogs we love, and of course presenting all of the new and wonderful product in our stores. Please tell US what YOU love about the PZ blog!!

Stay tuned for the announcement of the winner of the $20 Gift Card!!!

--Kim

Wednesday, March 30, 2011

Paper Weddings

When I recently got married I really wanted to incorporate paper into my wedding in a unique way. I eventually decided a handmade cake topper would be the way to go, but had troubles finding ideas beyond the traditional plastic bride and groom.

So I contacted my favorite paper blogger, Ann Martin (All Things Paper) and asked her for ideas. Ann pointed me in the direction of Concarta who made the cake topper above. They make some of the most beautiful and unique cake toppers I've ever seen. And they are made of paper! I love the ones with the doggies.

BUT, while perusing Concarta's wonderful designs in a blog post by Ann, I was inspired by a quilled hair piece that she designed for a bride pictured to the left. I knew I wanted this flower sitting on top of my cake.

I asked Ann if I could borrow her idea and she graciously pointed me toward Crimson Poppy, the maker of the beautiful flower on top of the quilled base made by Ann. If you want to see some unbelievably real looking paper flowers, you MUST spend some time perusing the Crimson Poppy catalog. Yes, that bouquet to the right is made of paper!!


I honestly wanted to ditch all of the real flowers in my wedding in favor of Crimson Poppy's beautiful bouquets. But, alas, I was short for time and instead the creative mind behind Crimson Poppy, Jenny Jafek-Jones, rushed me 3 gorgeous white flowers (pictured left) that she made especially for me to use in making my own cake topper. Thank You Jenny, you're wonderful!

My next challenge was creating the quilled base worthy enough of the beautiful flowers. I started with light blue quilling paper that matched my wedding invitations and which I later matched the cake icing to. For a refresher on how to make basic quilled shapes, refer to my older blog post which includes 2 quick videos.

For the base, I started with 5 teardrop shapes which I anchored with 5 loosely coiled circles. I then created "wings" by making loops out of 2 pieces of quilling paper glued at the base. The wings were then anchored by a cats eye shape on either side. For additional dimension and to strengthen the attachment of the wings, I added 3 tightly coiled pieces at the base of each wing. For even more dimension and width, I added 4 Curly Q's in various spots. The finishing touches were to add a cats eye shape to the center top.

Once the quilled base was done, I inserted the stem of the paper flowers which were ultimately what was inserted into the cake. My final cake top I ended up only using the 2 smaller flowers.

The end result was a cake with a quilled touch that was very dear to my heart. The cake topper was meant to lay flat on the cake but the chef couldn't bear to get icing all over the quilling!


Thank you Ann and Jenny for your part in making my cake top a fun and personal touch to the most memorable day in my life. And, yes, the cake was scrumptious! -Kim

Tuesday, December 21, 2010

9th Day of Christmas: Quilled Snowflakes

Warning, I am not a quiller. I have never watched a video on quilling, read a book on quilling, nor have I looked at any real instructions on how to quill. But I got so excited by the craft, I bought all of the supplies and my amateur status hasn't deterred me from trying different projects. Given that warning, you should know that if I can make this snowflake, anyone can. I mean ANYONE.

Supplies needed for this project are quilling paper, a circle board, a slotted quilling tool, glue, spray adhesive and quilling tweezers. For the glue, you'll want a nice, fine tipped adhesive that dries quickly and dries clear.

To create the snowflake pattern I designed, you'll need to make 6 large cat eyes, 6 small cat eyes, 12 small tight coils and 1 large tight coil. They actually call the "cat eye" shape a "marquise", but I like to coin my own phrases and they look like eyes to me, so there you go.

For the larger cat eyes, I used an 18 inch piece of quilling paper and the 1 inch circle. For the smaller eyes, I used a 10 inch piece of quilling paper and the 1/2 inch circle. For the small tight coils, I used 9 inch a piece of quilling paper and for the large tight coil I used one whole piece (18").

The following 40 second video demonstrates a standard quilled circle, the starting point for the cat eye shapes:

To create the cat eyes, you start with a quilled circle. And then pinch the ends. So easy! This 15 second video demonstrates shaping of the eyes:


Creating the tight coils is a snap: wind the paper on the slotted tool, carefully remove and glue.

Making the Snowflake: To assemble the snowflake take your 6 smaller cat eyes and organize them so that they can easily be glued together leaving only a small gap in the center. Apply a small amount of glue on the side of each tip, place the cat eyes in place and let dry.
Next, attach the larger eyes to the tips of each smaller eye. You will attach these by placing the small coiled pieces on either side of the tips and adding a big glob of glue in the middle. This is why you want clear glue. These pieces will take a little longer to dry.

Tip
: Keep checking your pieces while they dry to make sure they are not sticking to your work surface or you will have a beautiful snowflake adhered to your table. Working on a glossy surface like a magazine or wax paper helps.

Finally, add the large coiled piece to the center with a dollop of glue.

Lastly, you want to harden this baby up so that you can hang it on your tree, attach it to a wrapped package, or hang it from your dogs collar. This is accomplished with the spray adhesive.
When the snowflake is dry enough to move without falling apart, place it on a piece of wax paper. Take it outside and spray it like crazy. Bring it back inside and transfer it to a clean piece of wax paper. In the morning you'll have a nice, stiff snowflake, ready for hanging.

Phew, that was a long post! But really the snowflake takes less than 30 minutes to make including drying time before the spray adhesive. Let it snow, let it snow, let it snow! --Kim

Tuesday, June 29, 2010

Wanna thrill them? QUILL 'em!


I am oh so excited to write about the new quilling kits and supplies arriving this week at Paper Zone. After seeing some amazing quilling designs in a recent Oprah magazine, I asked Amanda to buy a kit as a sample and I think I heard angels sing when I opened the little box. First of all, the set is awesome. The kit includes a convenient carrying case, PAPER, quilling tools, tweezers, glue, and instructions that show you how to make basic shapes and designs.

For those of you that know me, you know that I can be crafty when guided, but oftentimes my projects end up looking like a 2nd grader did them. But this quilling was a snap! I kid you not that my first attempt was this little dragonfly to the left. It was so easy! You seriously just coil the paper using the tool, pinch it to shape and then glue it into place.

Next I attempted something bigger: the flower.

I was so happy with the results I decided to put the two together to make a little card using PZ facets, an embossing tool and powder for the "Thinking of You" and touching it up with some colorful rub-ons from American Crafts. Making this card was so fun, quick and easy I am so excited for everyone to try the art of quilling.

According to wikipedia, quilling was popular in the 18th century amongst "gentle ladies of quality" because the hobby was not too taxing on their minds. To that I say, "sign me up!".


I truly hope this art style makes a comeback because it's not only easy and fun, it's really quite beautiful and unique. . .yet another wonderful art form using our favorite medium: paper. Stay tuned for tutorial videos and hopefully a class or two. All you ladies (and gentlemen) of quality, get ready. . .your new hobby is here. --Kim