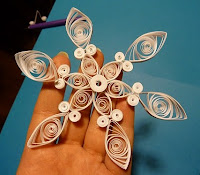
 Warning, I am not a quiller. I have never watched a video on quilling, read a book on quilling, nor have I looked at any real instructions on how to quill. But I got so excited by the craft, I bought all of the supplies and my amateur status hasn't deterred me from trying different projects. Given that warning, you should know that if I can make this snowflake, anyone can. I mean ANYONE.
Supplies needed for this project are quilling paper, a circle board, a slotted quilling tool, glue, spray adhesive and quilling tweezers. For the glue, you'll want a
 nice, fine tipped adhesive that dries quickly and dries clear.
To create the snowflake pattern I designed, you'll need to make 6 large cat eyes, 6 small cat eyes, 12 small tight coils and 1 large tight coil. They actually call the "cat eye" shape a "marquise", but I like to coin my own phrases and they look like eyes to me, so there you go.

For the larger cat eyes, I used an 18 inch piece of quilling paper and the 1 inch circle. For the smaller eyes, I used a 10 inch piece of quilling paper and the 1/2 inch circle. For the small tight coils, I used 9 inch a piece of quilling paper and for the large tight coil I used one whole piece (18").
The following 40 second video demonstrates a standard quilled circle, the starting point for the cat eye shapes:
To create the cat eyes, you start with a quilled circle. And then pinch the ends. So easy! This 15 second video demonstrates shaping of the eyes:
Creating the tight coils is a snap: wind the paper on the slotted tool, carefully remove and glue.
Making the Snowflake: To assemble the snowflake take your 6 smaller cat eyes and organize them so that they can easily be glued together leaving only a small gap in the center. Apply a small amount of glue on the side of each tip, place the cat eyes in place and let dry.


Next, attach the larger eyes to the tips of each smaller eye. You will attach these by placing the small coiled pieces on either side of the tips and adding a big glob of glue in the middle. This is why you want clear glue. These pieces will take a little longer to dry.
Tip: Keep checking your pieces while they dry to make sure they are not sticking to your work surface or you will have a beautiful snowflake adhered to your table. Working on a glossy surface like a magazine or wax paper helps.
Finally, add the large coiled piece to the center with a dollop of glue.
Lastly, you want to harden this baby up so that you can hang it on your tree, attach it to a wrapped package, or hang it from you
 r dogs collar. This is accomplished with the spray adhesive.
 When the snowflake is dry enough to move without falling apart, place it on a piece of wax paper. Take it outside and spray it like crazy. Bring it back inside and transfer it to a clean piece of wax paper. In the morning you'll have a nice, stiff snowflake, ready for hanging.

Phew, that was a long post! But really the snowflake takes less than 30 minutes to make including drying time before the spray adhesive. Let it snow, let it snow, let it snow! --Kim

WOW! That is an amazing quilling project!
ReplyDeleteThat is so gorgeous! Thanks for explaining how to do it so simply!!!
ReplyDeleteLove it! I like the size too. Perfect for a beginner quilled project. Are you doing classes for quilling since you carry supplies?
ReplyDeleteAmazing! I'll have to share this post with my sister who has been interested in quilling...you did a great job of explaining for a beginner!
ReplyDeleteBeautiful! Thanks for sharing.
ReplyDeleteThis turned out so great. I just started quilling and I love it so far. Thanks for sharing.
ReplyDeleteNicely done and I agree it is easy for beginners to get the basics of it. I love the final outcome and oh the possibilities!
ReplyDeleteWhat an awesome snowflake! My sister's wedding is winter themed and these would be perfect, easy decorations. Thanks for the inspiration!
ReplyDeleteLooking forward to making these tonight. Thanks for sharing. Merry Christmas!
ReplyDeleteCindi Byrd, Ketchikan, AK
What a gorgeous snowflake. Hard to believe you've never quilled before. It's beautiful.
ReplyDeleteI love anything handmade crafts!
ReplyDeleteThese are beautiful! Thanks for sharing all your awesome ideas! I love paper zone!
ReplyDeleteYAY quilling! I loove quilling! And this is such an amazing idea for it! Thanks for sharing, now I know what to do with all my quilling paper tomorrow! :)
ReplyDeleteVery pretty. It makes me want to get the supplies right now & try it.
ReplyDeleteI love the way quilling looks. What a pretty snowflake.
ReplyDeleteThese are gorgeous! Love the look of these...thanks for sharing!
ReplyDeleteHi Thank you so much for sharing. I have subscribed to you you tube location
ReplyDeleteThank You again Bev
I haven't tried quilling - yet! This is gorgeous!
ReplyDelete