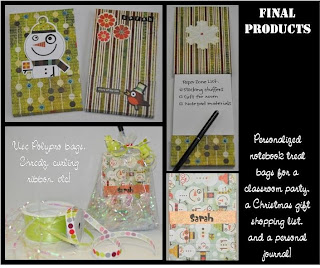
 Although I do love making tasty treats around the holidays, I was trying to think of something different to do for my kids to hand out to their classmates this year. I needed something fairly easy since I had to make close to 60 of them and, of course, cost effective. So I came up with personalized note pads! These are quick, easy, and the end product is a cute, creative, and useful gift! Make these for stocking stuffers, gifts for co-workers, your favorite bank teller…or impress your boss!
 For this project you will need:
- 3x5 notepad (only $0.59 each!)
- 12x12 cardstock paper (double-sided works best so that both the inside and outside are decorative; you can make 4 notepads out of each 12x12!)
- Scor-it-All Board
- Paper cutter
- Adhesive (ATG is my favorite!)
- Magnet tape with adhesive (only $1.29 for a 30 inch roll!)
- Any embellishments you may want to add (rub-ons, jewels, letter stickers, etc.
Follow these simple steps:
- Cut a 12x12 sheet of cardstock into 4 strips, each measuring 3” x 12”.
- Using the Scor-it-All Board, score at 1 ½ ” , then at 1 7/8”.
- Starting from the other side, score again at 4 11/16” and at 5 1/16”.
- Fold all scores, pressing firmly to make sure you have a nice indent.
- Put adhesive on the middle section and the small section you scored closest to the long end.
- Attach a 3x5 notepad. The adhesive will attach the cardboard back and top of the scratch pad to the decorative paper. Press firmly to make sure it attaches well.
- Using the magnet tape with adhesive, cut two small, equal pieces.
- Attach one to the front of the largest section of the notebook.
- Before removing the adhesive of the second piece of magnet, stick it to the first piece (magnet to magnet). Remove the adhesive backing and fold up the little flap to adhere. This way, the magnet pieces will be lined up.
You can embellish if desired. I attached a vellum strip printed with each classmate’s name for the class party favors. I just put them in a Polypro bag, tossed in some Shredz, added a pencil, a few pieces of candy, and topped it off with a piece of decorative and curling ribbon and they were adorable! (And less than $1.00 each!) On other ones I have made, I added adhesive pearls, cardstock stickers, and letter stickers. So many possibilities! --Sarah, Tacoma Store


Wonderful craft!!! So excited to bookmark and create these later on!
ReplyDeleteCute! I think I could do that... ;)
ReplyDeleteToo cool! These could work as little gifts all year long! :)
ReplyDeleteWhat super idea!
ReplyDeleteThis is a cool idea. I do have a question. Do you attach the note pad to the holder?
ReplyDeleteThis would make a great year round gift! Thanks for sharing - look forward to trying it out!
ReplyDeleteThese are such great stocking stuffers!
ReplyDeleteso cute! great all year long!
ReplyDeletelove it!
ReplyDeleteThese are so cute! Thanks for the tutorial!
ReplyDeleteI love these! I've made them for many occasions, but why did I forget to make them for quick and inexpensive Christmas gifts?!? Thanks for the great reminder!
ReplyDeleteGreat idea - I see grandparents gifts next Christmas.
ReplyDeleteOh my gosh! Those are sooooo amazing! I want to go buy the stuff to do it right now! What lucky kids that got those for school too!
ReplyDeleteWhat a great idea and the magnetic closer is genius! Thank you for showing us this project. :)
ReplyDeleteGreat gift idea! Who doesn't need a note pad?
ReplyDelete