 This is a special post from Rachel.db of the Portland Paper Zone, on her last day working for PZ.
I kind of feel like it’s my birthday and the last day of camp/school all rolled up together. My birthday because I got dressed up to come to work today, my last day at the Paper Zone, and there was even a cupcake with my name on it waiting for me!
It’s also like the last day of camp/school because I’m saying goodbye to a lovely crew of people I’ve gotten to share the last two years with. My PZ pals are going down in my memory book in a pretty fantastic time of life. 2008-2010: my worker-owned bike shop was starting and my own personal business has grown. It’s with a fond farewell that I say goodbye to my blue PZ apron, and my coworkers- though we’ll be keeping in touch. I can catch them at local craft shows. Did you know that most of the associates at the Portland store are also self-employed? I’ll be keeping tabs on Andrea’s BeeTwixt shop, Barb’s Ciao Birdie Designs, Devan’s Nimbi Designs, Mari’s Trulee Twisted Jewelry, Liz’s graphic design. Since I won’t be working on the weekends anymore, I am definitely finding Mayzie’s table at the Portland Zine Symposium, and stopping by on Sundays to talk with Paola about new food dishes to try out at home. Since I mentioned everyone else by name, I also want to give a shout out to Jack, Portland’s captain, I’ll miss working with you all.
 Inside the K.I.T. is a handstamped good bye card (complete with sappy sentiments), and a Rachel.db calling card with contact information for current ventures.
Product Shoutout: Only the
Each R.D.B-K.I.T., uses:
1/3- sheet of a scrapbooking 12x12
2- brads
2- 3/4”circles (punched from scrap pieces of the 12x12s)
1- 10” piece of baker’s twine (ribbon, raffia, or string will also work!)
Tools you will find helpful in assembly are:
Bone folder
3/4” circle punch
3/16” hole punch
Scissors
1. Come to the Portland Store and pick out paper and have us cut your envelopes (“eps,” in hip paper store lingo) on our Accucut machine. Ask for your scraps! ( If
2. Fold and burnish all the sides of the envelopes (burnishing, as far as paper is concerned, is the act of smoothing a fold by applying pressure along the fold with a bone folder.) 
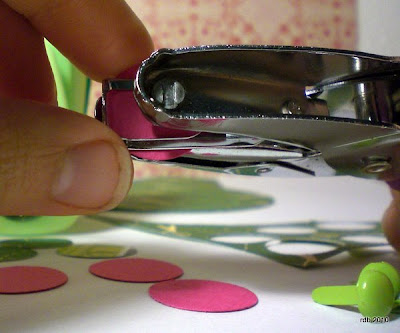
3. Since you remembered to ask for your scraps (step 1), you have extra paper to punch out circles. Using your ¾” circle punch, punch two circles that will be used to loop the string/twine/ribbon around for closing the eps.
4. Use your 3/16” handheld hole punch to do just that, punch out a hole in the middle of your little circles. A brad will go through this hole, and through the pre-cut holes of the eps to secure the circle. (see the collage below)
Sometimes a contrasting color makes everything pop!
5. Cut 10” of string, twine or ribbon, that you like, to match your eps.
6. Locate the top flap of the eps. The top flap has the brad/circle dealy-bobber closer to the edge. Wrap the twine underneath the paper circle with enough of a tale to tie a knot.
7. Tie a knot to secure the twine and trim the excess tale. 
8. Fill with your K.I.T. goodies and loop the twine under and around the brad circles, and give to your BFFs to whom you have to say TTYL.
Good-Bye Paper Zone. I miss you already. Let’s Keep In Touch.


No comments:
Post a Comment