
 When I recently got married I really wanted to incorporate paper into my wedding in a un
 ique way. I eventually decided a handmade cake topper would be the way to go, but had troubles finding ideas beyond the traditional plastic bride and groom.
So I contacted my favorite paper blogger, Ann Martin (All Things Paper) and asked her for ideas. Ann pointed me in the direction of Concarta who made the cake topper above. They make some of the most beautiful and unique cake toppers I've ever seen. And they are made of paper! I love the ones with
 the doggies.
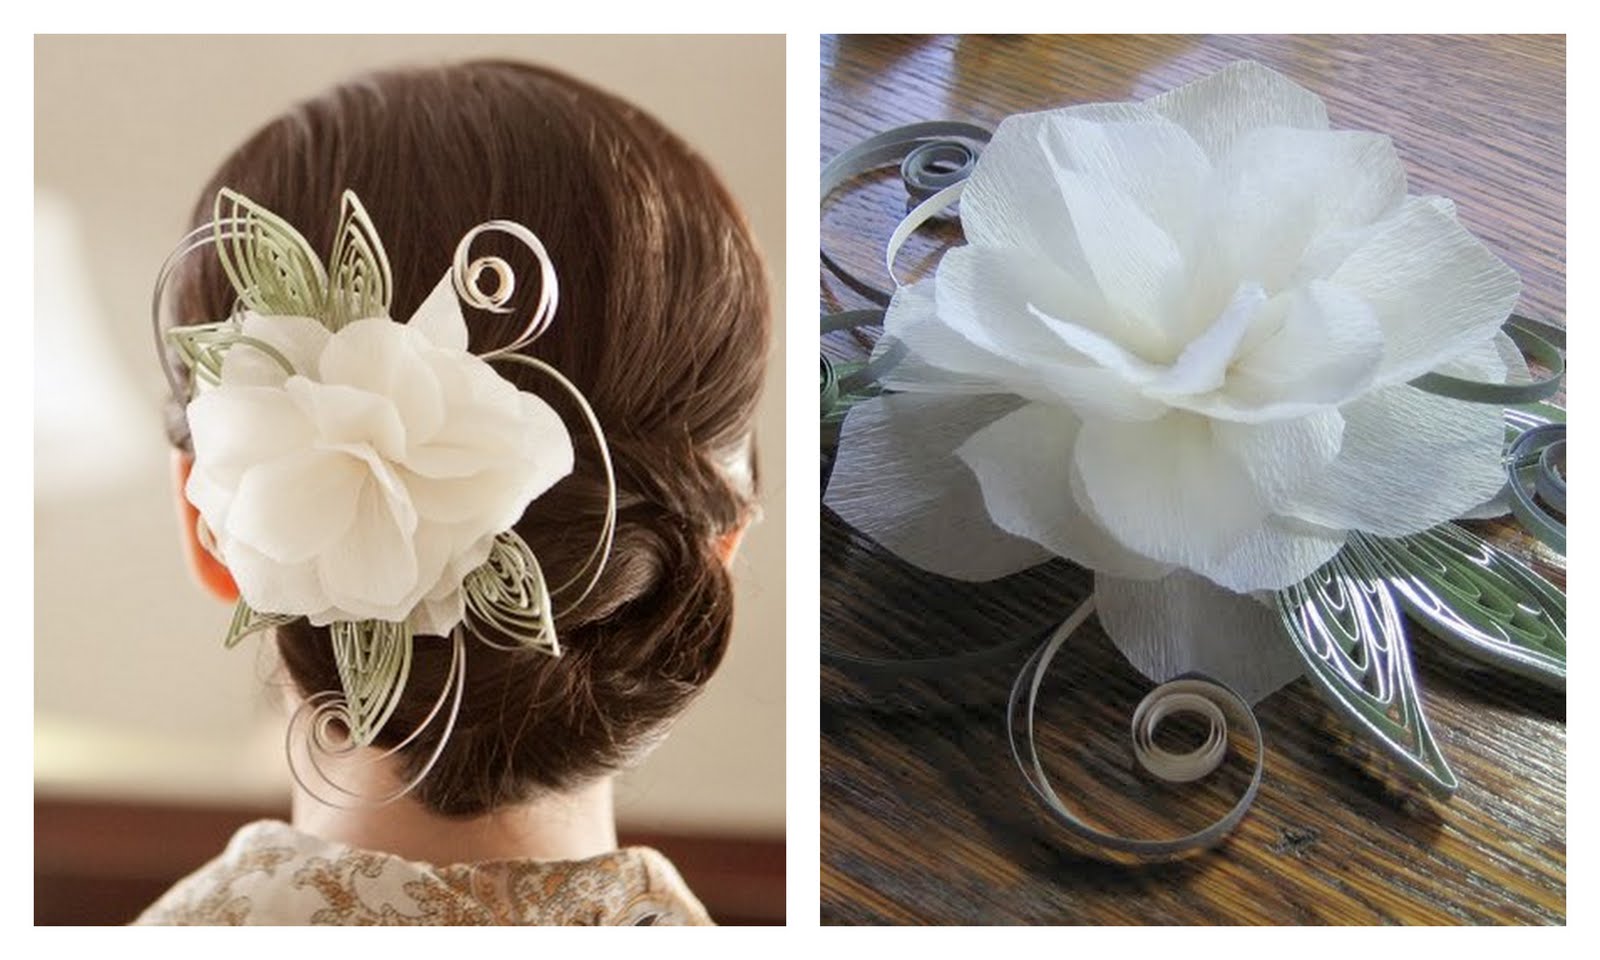
BUT, while perusing Concarta's wonderful designs in a blog post by Ann, I was inspired by a quilled hair piece that she designed for a bride pictured to the left. I knew I wanted this flower sitting on top of my cake.
I asked Ann if I could borr
 ow her idea and she graciously pointed me toward Crimson Poppy, the maker of the beautiful flower on top of the quilled base made by Ann. If you want to see some unbelievably real looking paper flowers, you MUST spend some time perusing the Crimson Poppy catalog. Yes, that bouquet to the right is made of paper!!
I honestly wanted to ditch all of the real flowers in my wedding in favor of Crimson Poppy's beautiful bouquets. But, alas, I was short for time and instead the creative mind behind Crimson Poppy, Jenny Jafek-Jones, rushed me 3 gorgeous white flowers (pictured left) that she made especially for me to use in making my own cake topper. Thank You Jenny, you're wonderful!
My next challenge was creating the quilled base worthy enough of the beautiful flowers. I started with light blue quilling paper that matched my wedding invitations and which I later matched the cake icing to. For a refresher on how to make basic quilled shapes, refer to my older blog post which includes 2 quick videos.
 For the base, I started with 5 teardrop shapes which I anchored with 5 loosely coiled
  circles. I then created "wings" by making loops out of 2 pieces of quilling paper glued at the base. The wings were then anchored by a cats eye shape on either side. For additional dimension and to strengthen the attachment of the wings, I added 3 tightly coiled pieces at the base of each wing. For even more dimension and width, I added 4 Curly Q's in various spots. The finishing touches were to add a cats eye shape to the center top.
Once the quilled base was done, I in
 serted the stem of the paper flowers which were ultimately what was inserted into the cake. My final cake top I ended up only using the 2 smaller flowers.
The end result was a cake with a quilled touch that was very dear to my heart. The cake topper was meant to lay flat on the cake but the chef couldn't bear to get icing all over the quilling!

Thank you Ann and Jenny for your part in making my cake top a fun and personal touch to the most memorable day in my life. And, yes, the cake was scrumptious! -Kim


 Next, arrange your photos on your base papers in a way that you find appealing. I am using two groups of photos. The first are posed photos of me and my family. Since there is a lot of color in these photos, I put them on a neutral solid paper. The second group of photos are action shots of dancing. I put these on a colorful and busy patterned paper because the photos are lacking color.
  Next, back your photos with solid color paper. Start by using your ATG gun to adhere your photos to your paper. In my previous post, I encouraged you to cut the paper to a certian dimension and then adhere the photo. That is an easy way to adhere photos that are 4X6. In the case below, I cropped this photo, so it was an odd size. I find it easier to border odd-sized photos by adhering them to the paper first and then cutting them out.
 Next, you want to choose a photo on each page to highlight. On this page, I chose a close up shot of my father and I. A nice subtle way to highlight a photo is to back it on a different colored cardstock. This will make the photo pop and catch the onlookers eye.


