Thursday, July 29, 2010

Tins of Fun


Hello Everyone! One of the things I love about Paper Zone and Paper Zone's product is that it can be so versatile and the simplest little thing can be turned into a cute gift or fun treat for someone. This week, the products of choice are tins from Pinecone Press. We have some amazingly creative people in our stores and you'll agree once you see what Jenn in Shoreline created. She took one of the smaller tins and created a very cute and very useful sewing kit. It's so cute, I'd love to have that in MY purse!

She took her creativity up a notch and created the most adorable traveling version of Tic Tac Toe which smartly uses a CD size tin along with magnets also sold in our store. How great is that?!?

Sarah in Tacoma also had a fabulous creation using the tins to house a "Critter Card Kit" she made using the adorable Max & Whiskers line and Pop Tones.

So next time you see a tin, remember that the possibilities are endless. And with a little bit of paper, some embellishments and a touch of creativity, you can really have something special (from a tin!!). --Kim

Monday, July 26, 2010

New Papers from Hambly!


We just received a new shipment of screenprinted papers and overlays from Hambly. I have always been a huge fan of their papers, and this release features some really fun designs from peacock feathers to cupcakes to doilies. These 12x12s are so great for so many different projects beyond scrapbooking.

Our Salem store came up with this cute idea for a cupcake box. Using one of our everyday cube-shaped gift boxes, they cut out a window and placed an overlay (basically a clear sheet of acetate that has these cupcakes printed on it) over the opening. Really simple, but such a great idea! A couple of little added embellishments on the top make a perfect little package and gift for any birthday boy or girl. PLUS...the papers actually even smell like vanilla!


I saw another creative use for the overlays on Hambly's blog. They basically modified a plain Ikea lamp to transform it into a really striking piece of room decor. See the full details and how to on thier blog at: http://hamblyscreenprints.typepad.com/screen_prints_blog/2010/06/ikea-lamp-hack.html


What kinds of projects have you come up with using overlays? We'd love to see some more ideas! Happy Crafting! -Amanda

Friday, July 23, 2010

Calendar Crazy

Can you believe it's almost August? Soon it will be back-to-school time and then the holidays and then, before you know it, a new year! Yikes!

Speaking of a new year, do you know how much I love calendars? No joke. Last year I bought three and I received two as gifts. That's five calendars! Why do you need so many calendars, you may wonder? Are you really that busy? Well, no, I'm really not that busy, and truth be told, I did end up giving away one calendar, but when it comes to calendars, I really can't help myself. More than marking the passage of time, calendars can be great conversational pieces and a fun way to spruce up your environment.

I especially love Cavallini calendars, of which I bought one last year. They are so sophisticated and timeless looking. I really appreciate the quality of the images and the paper they are printed on. These calendars are so beautifully done, in fact, that one could easily cut out a month's or even a full year's worth of images, mount and frame them, and hang them on the wall for an elegant display.

We just got a shipment of these calendars in at the stores for both the wall and desk and you can be certain that I will be getting my hands on one (or two or three) very soon!
Tiffany

Wednesday, July 21, 2010

Fabric Paper!


We just got a shipment of fun new stuff from American Crafts in our stores... I couldn't wait to get my hands on the Fabric Paper! This stuff is co cool! It comes as a 12x12 inch sheet of paper-backed fabric that already has adhesive on the back! We received an assortment of printed and solid sheets.

I made a little mini book and used the fabric paper to bind my book and to decorate it. Take a look:
I wanted my book to be 5x7, so the first thing I did was cut down my pages to 5x7.Then I cut the fabric paper into strips of 3x5 and scored them in half at the 1.5 inch mark. (These pieces are going to used bind my book. You will need one piece for every page of your book.)After I scored the fabric paper I then peeled off the backing to reveal the adhesive. To bind the pages together I put half of the fabric paper on one page and the other half on the next.

I repeated this step until all my pages were bound together.
I added a piece of the fabric paper to the outside covers. Then added photos and embellishments to finish it off.
Happy paper and fabric crafting! Christina

Monday, July 19, 2010

Corner Bookmark

Hi Everyone

I hope that you are enjoying a great summer. Don't forget to take a little time out of the busy summer activities for yourself to do a little fun crafting project. I personally like doing mine in front of the air conditioner duct!!! I have also been known to take all of my crafting supplies outside on the picnic table and enjoy getting a little sun. I guess it would depend on how warm it is outside!!

I found this idea for a corner bookmark and thought it was just too cute. The bookmark has a little pocket in it that fits over the corner of a page to hold your place.

These don't take very long to make, and I think I am going to be making a lot to give away as friendship gifts.


Supplies

One 4" x 4" piece of cardstock
One 2 3/4" x 2 3/4" piece of cardstock
Score-it™ or other scoring tool
Paper cutter
Adhesive tape
Boarder Punch
Stamps, Ink, or embellishments to decorate.
Step 1
Mark the center of three sides of the 4" cardstock square.


Step 2
Place your cardstock square on your scoring tool so two of the marked spots are aligned in one groove. Score between the markings. Repeat on the other side.


Step 3
Prefold at both score lines.


Step 4
Add a decorative border to the unscored side of the 4x4 cardstock square.


Step 5
Line up the 2 3/4" cardstock square diagonally in your paper cutter. Cut the square in half, (corner to corner, to create two triangles. You will need both triangles.

Step 6
Adhere one of the triangles on the front of the bookmark with adhesive and decorate.


Step 7
Turn the bookmark over, fold your corners back in and apply adhesive. Adhere your second triangle over the flaps. This will keep your bookmark closed.


Turn the bookmark back over and it is finished.
For this bookmark I used
Stardream Serpentine Cardstock as the base
Kioshi Motochi 12x12 by Basic Grey for the accent paper
Martha Stewart Doily Boarder Punch
Kioshi Bloomers by Basic Grey for the embellishment
A small piece of ribbon for the bow.
I am also going to make some of these bookmarks using chipboard cutouts and stamps and see where the creativity takes me.
I hope you have fun making these little bookmarks.
Happy Crafting
Sandra

Friday, July 16, 2010

Be Inspired!

Inspiration can come from so many places, wouldn't you agree? A few notes of a forgotten song heard on the radio, the smell of fresh baked bread wafting through the air, waves crashing on a beach, the verdant emerald hue of a forest...any number of things on any given day can spark the imagination and transport one into a pleasant reverie. And sometimes, if the inspiration really gets a hold of you, you might find yourself turning out a tangible something or other, like mixed CD or loaf of yummy whole wheat bread to share with your family.

Sometimes when I get inspired by something or feel like I need to harness some of my current passions to help me carry out a project or put a plan in place, I like to make myself an inspiration board. Some people call such boards mood boards or dream boards. Whatever name you give such a boards, they can be great tools for focusing your energy and ideas.

Right now I am really in vacation mode. It's that time of summer when the weather is finally nice (at least up here in the good ol' Pacific Northwest) and when life beyond my doorstep beckons. At the moment, I am particularly tuned into camping and cabin life and the great outdoors. Maybe it's because we had such a long winter and no spring here that I'm itching to be out in nature (minus the bugs). The smell of a campfire, the stillness of a lake in the early morning, lemonade, hiking...these are the things I am dreaming about. That said, I've come up with a little collage for myself, which I am using to plan a little getaway at the end of the month and perhaps some cards to write while I am away.


It's super easy to make an inspiration board. All you need is a board (I've used an 11x17 black board), some good images, bits and bobs of this and that (fabric, ribbon, etc) related to your inspiration and an ATG gun to glue the images to the board.
Whatever happens to be catching your fancy, put it in front of you and see what comes from it. Be inspired!
Tiffany


Thursday, July 15, 2010

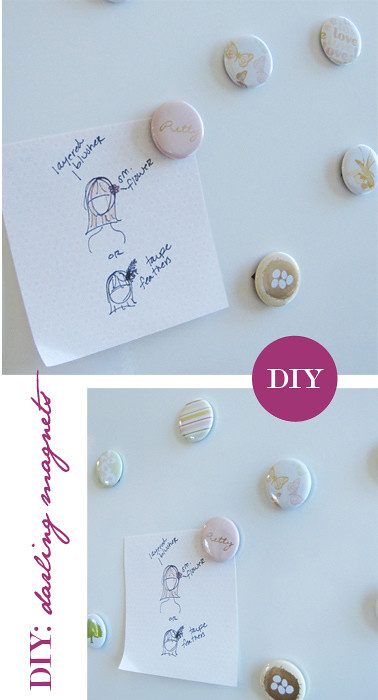
DIY: Darling Magnets

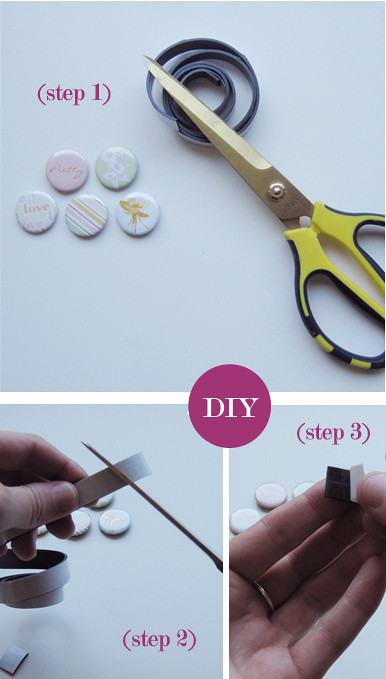
Step 1
Find your magnet to be! I bought these pre made button like stickers, and just pealed off the small piece of adhesive that came on the back.
Step 2
Rolls of magnet tape are pretty inexpensive, and although not super strong, work well for light weight pieces. Cut a small strip for the back of your magnet to be.

Step 3
Peel the backing off the magnet piece and adhere to the back of your new magnet!

Working in the Portland store I am surrounded by many talented customers who keep my inspiration on its toes. When we received these sweet little stickers I felt a DIY project in my fingertips. The button like stickers we just received as a part of the newest line from American Crafts called "I Do". I fell in love with the whimsey feel of each one and then I remembered I have two clean white magnet boards at home in need of new magnets. For under $5 this small project was very pleasing to make happen! Other great materials that can be turned into magnets are old buttons, chipboard cut outs, or maybe a laminated photo you adore. Think outside the box a little! For more daily ideas read along my personal
blog: bee keeper studios.

Happy crafting!
Andrea

Monday, July 12, 2010

Wedding Countdowns

It seems like a lot of my friends are in wedding mode this month, I keep hearing countdowns to wedding dates and final to-do's being checked off of checklists. We are off to celebrate one of my best friend's bachelorette parties over in Lake Chelan this weekend and I can't wait to just relax and enjoy the sunshine with my girlfriends. Since weddings are in the air this month, I wanted to show you the new scrapbook line from American Crafts, rightfully named the "I Do" collection. I'm in love with the simple and sophisticated prints on these papers.

My favorite part of the collection are the adorable embellishments - they're just so much fun with all the different textures and materials. These little felt stickers are so simple and elegant. I can imagine these being hot glued to a bobby pin to create a little hair clip, or even glued to a pin to create a decorative brooch to secure (and add a little pizazz) to a plain summer sweater. And the Flair buttons are the perfect way to add some depth and pop to a card - I think my friends will be receiving some handmade wedding cards, I'll share them with you once I create them!


I actually bought some of these Flair buttons around the holidays last year and they made for perfect little wine tags for my stemless wine glasses. I gave all my friends a button when they walked in the door to stick to their glass and it worked perfectly and made for a nice, festive addition. Cheers to everyone who is getting married (or helping someone plan a wedding) this summer! --Lauren

Friday, July 9, 2010

Chalk Art

I had the chance to visit the beautiful city of Victoria, B.C. for the first time last weekend and as I was enjoying the sun and strolling down their quaint little streets, what was I thinking of? Paper Zone. That's right, PZ. That is because one night we came upon a street that had some washed out chalk images that were absolutely amazing. Unfortunately some time had passed and most of the drawings were faded and almost entirely gone, but they photographed amazingly well. And as soon as I saw them I thought about Paper Zone, partly because it coincided with our kids craft month featuring sidewalk chalk and I had asked the stores to see what wonderful creations they could come up with (see Seattle's awesome rendition of the PZ logo). And also, because it reminded me of the paper cow I blogged about a few days ago. Inspiration took these artists over and they knew that their end result would wash away in the rain, but they took the time to share their vision and creativity. And the only thing they needed to create such beauty was chalk and a sidewalk. Beautiful.

Enjoy the sunshine everyone! --Kim

Wednesday, July 7, 2010

Metallic StazOn

A few weeks ago we had a PZ employee stamp demo night. We were joined by one of our friends from Tsukineko who showed us the new Metallic StazOn ink.


This ink is so cool! I great thing about the StazOn is that the ink will dry on not just paper, but also on plastic and glass. If you haven't tried it you should!

Here are a few of the cards we made that night.

Happy stamping! Christina

Tuesday, July 6, 2010

Hi Everyone

It is summer, and the time seems to slow a little bit for me in the card making department. The major holidays are over, and I am waiting for the new scrap booking lines to come out so I can create my next round of holiday cards. This gives me more time to create cards for birthdays, special occasions, or some that are just for fun.

One thing that I really like to make is cards that have a unique feature. I wanted to share with you this great website I found for pop-up cards by Robert Sabuda. If you haven’t heard of him, Robert Sabuda creates incredible pop-up books, and his website also has directions on how to make several different pop-up cards.

I hope you enjoy his website and get a lot of creative ideas.

Happy Crafting

Sandra

Friday, July 2, 2010

Holy Cow!

I was going through some vacation photos from a recent trip to the island country of Curacao and I came across one that I took of a paper cow. This cow was interesting to me for several reasons. One, it was made out of paper and pretty cool; Two, it was displayed amongst a series of windows that were primarily devoted to fashion; Three, I like cows; and Four, it was for a store that sold flooring, huh? (scratching my head). I thought "why a cow?" I came to the conclusion that the creator of the paper cow was just inspired and went with it. I bet it got a lot of looks!

So I decided to look for other paper inspired window displays on the web and I came across this website: http://eloisecorrdanch.com/PaperSculpture. OMG! Here is just a sample of an amazing window she did for Macy's in New York. Visit her website and you'll truly be inspired. And to me, this is what Paper Zone is all about: taking something ordinary and turning it into something extraordinary.

I hope everyone has a bit of inspiration themselves this weekend, whether it's in creating a party favor or decorating a dessert for a BBQ. Little touches make the simplest thing special. Have a great holiday everyone! --Kim