Monday, February 28, 2011

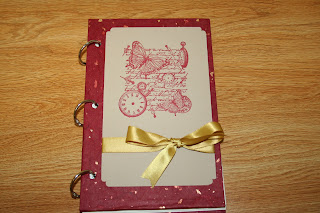
Organizer/Journal


Hi Everyone

I have been having a difficult time lately organizing my time. There just doesn't feel like there is ever enough time to get everything done. I am sure I am not the only one who feels this way. Obligations definitely seem to have a way of taking us over and running us down.

A very good friend of mine suggested I make a chart to organize my time to include all the things I want to do just for me. It is amazing how sometimes you just need someone to push you in the direction you know you should already be heading. I decided that this was a great idea and set out to make myself an organizer.

I have used this method to make journals that I like to give as gifts. I usually bind the journals I make with ribbon, but decided that if I used book rings instead, I would be able to remove and add more pages as I needed.

Ingredients for this project

Two 5.5x8.5 pieces of cardboard, bookboard, or mounting board
Two 12x8 pieces of decorative paper. (I like using handmade paper)
Two 4.5x7.5 pieces of cardstock
Crop-a-dile or hole punch
25-50 pieces of 8.5x11 sheets of text weight paper.
(I like Classic Crest Classic Natural White the best)
3 small book rings
Embellishments of your choice
Adhesive

Step 1

Cover your pieces of cardboard in the decorative paper as if you are wrapping a gift. Secure with adhesive.


Step 2
Cover the underside of the cardboard with the pieces of cardstock. Secure with adhesive. These are the front and back covers of your organizer
Hole punch the sides of each cover piece, paying attention that they are lined up identically.


Step 3
Embellish one cover as desired.


Step 4
Print out the pages of your organizerj. You can use this tempalte. Using a paper cutter, cut these to size and hole punch them. Pay attention to make sure they line up with the front and back cover of your organizer.


Step 5

Using book rings, bind the organizer together.


Happy Crafting

Sandra


Friday, February 25, 2011

Rosebuds

While checking in our order of new craft supplies, I was reminded of a fun project I learned many years ago in my high school Home-Ec class. These simple little rosebuds are easy to make and would be an adorable favor for a wedding or shower. I think they look a little like tulip bulbs, so they would also be great to make in bright colors as a May Day gift. All it takes is a few dollars worth of floral supplies and a big bag of chocolate kisses to make dozens of these little buds.

What you need to start: a pair of scissors, a short length of floral wire (about 6”), a 4”x4” square of cellophane or crepe paper (doesn’t need to be a perfect!), 2 chocolate kisses, and maybe a few leaves cut from text weight paper.

Form your hand into an “o” shape, lay the cello over, and tuck a kiss—point down—into the opening. Set another kiss on top, flat sides touching.

Twist the ends of the cello around the kisses, and tuck the floral wire into the excess cello. There should be about an inch of cello at the base. You can secure it all together with some tape to keep it from untwisting.

Start wrapping the floral tape around the base of the bud. Wrap in the same direction as the twisted cello. Floral tape gets stickier as it’s stretched, so don’t be afraid to pull! I like to start about ¾” from the bottom of the bud, wrap up towards the base, and double back down to cover the floral wire.

If you made leaves, tuck them under the tape as you wrap down the stem. You don’t need to cover the whole wire with tape, just a few inches below the bud and any leaves to make sure it’s all secure.

Keep going to make a beautiful bouquet! Since floral tape is very sticky, I wrapped all the stems up together with a length from a roll of green crepe party streamers, and tied a bow around it. A cute (and edible) bouquet for all seasons! --Mayzie, Portland Store

Wednesday, February 23, 2011

More Fimo Projects!


Hi everyone! I will be in our Seattle Store this Saturday from 2-4 giving a free demo on Fimo clay! In light of this I wanted to share some of my recent Fimo projects with you!

The first project is this yummy clay doughnut!

1. Mix clay together to make the perfect color for the cake part of the doughnut. (I used equal parts brown and white with a little bit of yellow.)

2. Roll clay into ball.
3. Use a toothpick or other round tool to create the hole in the center of the doughnut.4. Take a small piece of brown clay and roll into ball, then flatten.
5. Repeat step 3 to create hole in the brown clay, for the frosting.
6. Press the brown frosting on top of the doughnut.

7. Roll out a thin line of colored clay of your choice for the decorative frosting.8. Apply the decorative frosting to the top of your doughnut and bake for 30 minutes at 230*. (I added some glitter to the other doughnut I made that is pictured at the top of the page, if you would like glitter on your clay project apply glitter before baking.)

Next up is how to create a clay embellishment for a card or other paper crafting project.

1. Roll Fimo into small ball and flatten slightly.
2. Impress stamp into clay (I like to apply a clear shimmery ink, VersaMark Dazzle, to my stamp before I impress it into clay, it makes it a little easier to release and also leaves the clay shimmery!)

3. Follow baking instructions on package (30 minutes at 230*)
4. You are ready to use you clay piece to embellish a card or other project!
I would love to see you this Saturday in our Seattle store for the free demo. I'll be sharing more Fimo projects and tips!
Happy Crafting,
Christina

Monday, February 21, 2011

Watercolor Stamping

Hi Everyone,

In addition to seeing tons of new companies and products, the CHA show is also always a great resource for new crafting techniques (or old techniques with a new twist). One of these new (at least new to me) tips I discovered was a way to make your stamped images take on a watercolor effect. This is such a simple technique, I was amazed I hadn't seen it before.

All you need to get started is a fine mist spray bottle filled with water, a rubber stamp in the image of your choice, and water-soluble markers in the colors of your choice. I am using the Tombow Dual Tip Brush markers and a cling rubber stamp from Hero Arts.


Use the brush tip of the marker to color in your image. You do not need to be real meticulous about it, but be sure to get a good amount of coverage on your stamp surface.


I like to start with the lighter colors and work up to the darker colors so I don't inadvertently stain the tips of my pens with darker colored ink.


Once you have the stamp covered in ink, just spritz the surface of the stamp with water-a couple of squirts should do the trick.


The ink will bead up on the surface like so:


Then stamp your image onto your paper of choice.


Lift away your stamp and you have a lovely "water-colored" image


You can use a little more water to make a more abstract image:

You can also stamp on various textures to create a different effect. Here I stamped on Sundance Felt paper. I found this to be more reminiscent of the type of paper used in traditional watercolor.


This is a great twist on traditional stamping technique and is perfect for some of the holidays coming up this spring like Easter and Mother's Day!

Happy Stamping!

Amanda

Friday, February 18, 2011

Paper Rosettes

We are so excited for our 11th Annual Wedding Extravaganza - the event is tomorrow from 11am to 3pm. There's been tons of planning and prepping for the event - from getting new wedding invitation samples (there are some pretty amazing ideas out there!), to booking some of the best local wedding vendors whom we adore (Mike's Amazing Cakes, Celeste Cooning, Cupcake Jones, JuneBug Weddings - to name a few). Each store is in tip-top shape with lovely paper projects to inspire you to personalize your wedding by creating your own invites, save the dates, favors and...my favorite thing: wedding decorations!

Our Beaverton store made this gorgeous window display for their storefront using paper rosettes and using circle punches, edge punches and scissors to make each rosette a little different:


This is a really simple and inexpensive decoration~ for each rosette, you will need 3 sheets of 8-1/2 x 11 text weight paper and some adhesive (with just one ream of text weight paper, you can get 83 rosettes!). You can also use scrapbook paper, handmade paper, or crepe paper for a different look. Look at how fun and whimsical they look when you bunch them all together with bright pinks, yellows and oranges - love, love, love this idea from The Sweetest Occasion:


And you can even use them as a centerpiece, like they did below. I love the hanging garland above the table as an added touch, learn to make that right here.

{Paper Rosette Centerpieces}

Ready to learn how to make these? I'll teach you in 3 simple steps! First, you will need to gather your supplies: 3 sheets of 8 1/2" x 11" text weight paper & an adhesive runner.

Step 1: Accordian fold each piece of paper lengthwise in about 3/4" folds


Step 2: Fold each accordian piece in half


Step 3: Adhere each side of the pieces together using your adhesive runner, creating your rosette


Punch a hole in the rosette and use fishing wire or matching ribbon to hang. If you wish to personalize each rosette with whimisical edges like our Beaverton store did, you can take these tips from Darlla (one of the paper pros behind the window rosette display): "We like to use the Martha and EK Success edge punches before doing the accoridian fold, and the use various hole punches after they are folded, and it creates a really nice effect. Get creative!!" You can round the edges with scissors, use a large circle punch to make a continuous circle design on the edge, use a small hole punch to make luminary-like holes through each panel...the paper possibilities are endless - just play around with it and see what you come up with! --Lauren

Wednesday, February 16, 2011

Criss-Cross Card


Hi Everyone

This is my latest card creation. I created this cute card as a get well card for my sister-in-law. It is a good way to be able to incorporate both sides of a double-sided 12x12. I think this is a very versatile design. I created a Valentine for my husband using this design last weekend, and I think it would be really good for a party invitation. There are just so many possibilites, and depending on the patterned paper and embellishments you use it can be re-created over and over again!

Ingredients for this card:

Two 4 1/4x 11 pieces of cardstock (for the card base)
One 4x5 piece of double-sided cardstock or paper
One 3 3/4x 5 1/4 piece of cardstock (for the insert)
One 3 1/2x4 3/4 piece of neutral cardstock (for the insert)
One 1 1/2 x 12 piece of cardstock (for the band)
Paper cutter
Adhesive
Corner Rounder
Scoring tool
Embellishments

Step 1
Score both 4.25x11 pieces of cardstock down the middle.

Step 2
Using a paper cutter, cut diagonally one piece of scored cardstock form the top center to the bottom left. Cut the second piece of scored cardstock from the top center to the bottom right.


Your two pieces of cardstock should resemble the picture below.


Step 3
Diagonally cut your 4x5 piece of double-sided cardstock corner to corner.


Step 4
Using a corner rounder, round the top two corners of both pieces of cardstock for the insert.


Step 5
Using adhesive, attach the diagonally cut patterned cardstock to the base pieces.


Step 6

Using adhesive on the back of one of the base pieces of cardstock, attach both pieces of the base together.
Your card should now resemble the picture below.


Now place adhesive on the bottom of the middle panel as well as the bottom of the top triangle flap. Tape the base of the card together.


Step 7
Using adhesive, attach the smaller piece of cardstock used for the insert to the larger piece. Embellish as desired.


Step 8

Score the 1.5x12 piece of cardstock at 5 5/8 inches, and again at 11 1/4 inches.


Step 9
Use adhesive on the 3/4 inch section and attach it to the other end to create a band. Embellish as desired.

Place your insert in the pocket.


Happy Crafting

Sandra